|
|
Advertisement:
|
|
Asetek VapoChill Mk2 Premium Edition |
|
Join the community - in the OCAU Forums!
|
Test Configuration, Power and Startup Issues
Test System Configuration
Motherboard: ABIT BE7 (i845PE) from SecretNet.
CPU: Intel Pentium4 2.0A (2GHz, 400MHz FSB).
Memory: Corsair XMS3500C2 (512MB, 1 stick) from Altech Computers.
Video Card: Gigabyte Maya II (Radeon 9700 Pro) from Plus Corporation.
HDD: IBM 60GXP 40GB (7200rpm, ATA-100)
PSU: Antec SL350 (350W)
Notes about R9700 Pro
I did have one odd issue during the testing, which I will mention briefly here to avoid cluttering up the rest of the review. During testing in the VapoChill, I found some instability during heavy 3D load - when running 3DMark2001 or Quake3. This occurred even at speeds where the system had been stable when aircooled (for example, 2.66GHz). The system would be fine for Folding@Home, POV-ray and other CPU-intensive benchmarks, but the 3D stuff would occasionally lock up. Note that this was extremely intermittent and hard to track down. Entire benchmark runs would be fine, and then one would lock up - usually when changing screens in 3DMark2001, sometimes in Quake3, but never during non-3D testing like POV-ray. I eventually made the problem go away by swapping out the Radeon 9700 Pro card for my trusty Leadtek GeForce3. However, I don't have a solid explanation for which component was causing the problem. Perhaps it's a compatability problem with the Radeon - but it didn't manifest during aircooled testing. Perhaps it's an issue with the VapoChill - but the system was rock-solid stable with the GF3 and, to be honest, it was perfectly fine most of the time with the R9700 Pro. I did try swapping in an Antec 550W PSU in case the extra load of the R9700 Pro hard at work was too much for the 350W - after all, the card draws enough power to warrant a separate power connector on the PCB. However, changing the PSU did not affect stability. Perhaps I had simply been lucky during the aircooled testing, to not experience the lock-up problem. I suspect that the BE7 motherboard, descended from the infamously-undervolting BD7-II, may be somehow to blame. Perhaps the load of the compressor and ChillControl, added to the R9700 and a highly overclocked CPU, is producing this instability. I honestly can't tell you. I will be testing the SocketA installation kit for the VapoChill early in the new year - this will eliminate the motherboard, so I will have more information then and will keep you posted.
Power Supply Installation
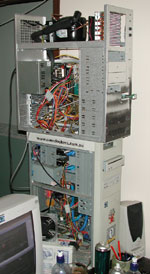
Asetek can provide a power supply with the case when you order it, but as mentioned earlier they didn't with this review unit. No matter - there's a range of manufacturers with decent PSU offerings these days. For the Premium Edition (as reviewed), the manual says it's important to have a PSU with a fan on the top, which will face towards the CPU when installed in the VapoChill. This will keep air flowing around the evaporator.
Installing or changing the power supply is a little tricky. Both cables from the PSU (the large ATX power connector and smaller 4-wire P4 connector) need to go via the ChillControl unit. Of course, they also have to go to the motherboard so it receives power. This is accomplished via two provided cables - a splitter cable for the large connector and a relay cable from the ChillControl to the motherboard for the smaller connector. Installing either cable onto the ChillControl is, frankly, a bit of a pain. Because of where the ChillControl is located, it's extremely fiddly to get the cables over to the far side of the PCB and install them.
When I first installed the PSU I was convinced I couldn't do it without removing the ChillControl from the chassis. In order to do this, you have to first remove the front fascia as there are 2 hidden screws holding the ChillControl's mounting plate in place. To remove the fascia requires the removal of 6 small torx screws. Why Asetek decided to use torx here I have no idea. Torx of course is the 6-pointed-star pattern that you usually find on Compaq boxes or other things the general public is discouraged from opening. Removing the fascia reveals no great secrets, so why not use normal screws? Even the top cover of the VapoChill, where the interesting guts of the cooling system live, has crossed torx screws so you can use a normal flat screwdriver on them. Perhaps I'll lose my Uber-Geek status now, but I don't have a decent set of torx screwdrivers - only a ratchet driver thing with a torx head. This didn't fit into the gap between the bulbous sides of the fascia and the metal chassis, so I had to remove the side parts of the fascia first. To do this you need to remove 6 philips-head screws. Then you can remove the screws holding the fascia on, then the fascia itself, then the mounting plate screws for the ChillControl. Then you can twist the ChillControl enough to squeeze the power cables onto it. Really, this is a hugely overcomplicated task and needs to be simplified. I would gladly sacrifice a drive bay for easier access to those sockets, or Asetek could provide header cables pre-connected to the ChillControl and dangling loosely for us to connect the PSU to.
I should note, after all that, that Asetek were surprised I needed to remove the fascia and ChillControl at all. They haven't made it a simple procedure because they didn't think anyone would ever need to do it. They were surprised at the difficulty I had with inserting - and even worse, removing - PSU cables from the ChillControl. I don't think I'm particularly uncoordinated and my fingers are not unusually large - but, as I'm the only one to complain so far, you may have an easier job of it than me. I did later discover that I could install and remove PSU cables from the ChillControl without taking the fascia off. When I changed PSU's while troubleshooting the Radeon issue above, I couldn't face doing it all again so simply used brute force and ignored the complaints of my fingers, finally wedging the cables into their sockets with the ChillControl in place. However, it was so fiddly I will definitely be taking the fascia off if I have to change the PSU again.
Startup and Power Issues
Having set the system up, it was time for action! Installation had quite literally taken a few hours, so I was keen to see just what all this effort had brought about. The startup sequence for the VapoChill is fairly impressive in a NASA-like way. Pressing the power button rewards you with a low hum, an intensely bright blue power LED and a row of blinking LED's on the ChillControl display. When you first power up, this blinking row stays for about 20 seconds while the compressor pressurises the cooling system. Then, when the evaporator temperature drops to 10C, the display switches to a countdown of the current evaporator temperature, which gives the whole thing a feeling akin to a space-shuttle launch in your computer room. Rather than "launching" when it reaches zero, it continues down to a default evaporator temperature of -5C, at which point the motherboard, hard drives etc power up and the system boots as per normal. The way the VapoChill handles this is that the reset switch is routed via the ChillControl PCB, and it holds the motherboard in the "Reset" state - as if you were holding down the reset button - until the evaporator temperature is low enough to start the system.
This is all very impressive, there's no doubt. Unfortunately, when I first fired up the system it reached -5C, I held my breath and, with a disgruntled whirr, everything shut down. Some minor troubleshooting revealed that I had indeed connected everything correctly as far as I could tell. A word to Asetek support revealed that this is a known problem, a very obscure one, that only affects ABIT's BD7-II and BE7 motherboards. Their earlier BD7 is fine. Something to do with how ABIT have implemented HyperThreading support, or something - I didn't quite get the details on the phone. Nevertheless, I'm using a BE7 for this testing and Asetek engineers assured me that a simple update of the ChillControl firmware (to the v1.5 beta) would get me going.
Ah, yes. Flashing the firmware. For any other component with firmware, say a video card or a motherboard, manufacturers nowadays are providing Windows utilities, some of which are even internet-aware, which makes flashing with the latest version a doddle. The ChillControl unit is not visible to Windows, of course, transparently integrating with the hardware side of things. That's a good thing, as it means they don't have to provide drivers for various operating systems and other complexity. So, AseTek provide a serial cable which plugs into an RJ jack on the back of the ChillControl and you boot off a floppy disk to configure or upgrade the firmware. Of course, if your system doesn't boot, it makes it a little tricky..
No matter! They all laughed at me down the pub when I said I have up to six PC's at home at any given time, but look who's laughing now! I hooked up a second PC's serial port to the ChillControl using the provided cable, and went to boot off the floppy disk provided. There ensued an hour or so of discovering (a) no PC in my house has a connected floppy drive (b) the floppy connector on the motherboard in my main desktop PC does not seem to work at all and (c) the other spare PC, while having a working floppy drive, is not stable enough to risk flashing firmware with. Fine. I built a testbed around a KT333 motherboard and used that. Flashing the ChillControl was uneventful and fixed the problem - the system started booting fine.
Forgive this mini-rant, but why, Asetek, do you not provide the ChillControl utilities and firmware on CD? It's nearly 2003 already and, while we don't yet all have flying cars, we do all have CD-ROM drives we can boot from - especially if we're the kind of person who's buying a VapoChill. Also, if you own an ABIT "MAX" series motherboard, the absence of serial ports is going to make talking to the ChillControl difficult - but VapoChill can't be blamed for that.
While we're in the ChillControl configuration, here's a screenshot showing the various things you can monitor (left) and parameters you can change (right).
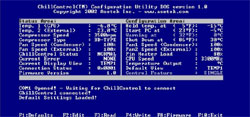
It's in here that you make the compromise between ultimate cooling and quiet cooling. At the default settings the VapoChill is very quiet, but if you want to go for the maximum you can set the fans to spin faster and make the compressor work harder, which does carry a noise penalty. I left it at defaults for now, but played with the settings during the top-speed runs. Speaking of which..
|
|
Advertisement:
All original content copyright James Rolfe.
All rights reserved. No reproduction allowed without written permission.
Interested in advertising on OCAU? Contact us for info.
|

|