|
|
Advertisement:
|
|
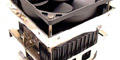
Scythe Kamakaze CPU Cooler |
|
Join the community - in the OCAU Forums!
|
Installation, Performance, Conclusion
Installation
Many would assume such a heavy cooler would not possibly mount onto a socket A system with the use of a traditional clip, and theyre partially right. Whilst the unit does not use mounting holes, the retention system which scythe call R.C.C.M. (Rigid Core Clamping Mechanism) uses the existing socket lugs. Basically this requires you to hold the heatsink above your CPU, place the retention system over the sockets lugs, slowly lower the heatsink onto the cpu, holding the clips over the lugs. When the heatsink has been lowered you grab out the old Phillips head and as Scythe puts it - Turn screws on both sides evenly, in clockwise to fasten the heatsink. Gradually tighten the screws until you feel the bars reach the top. Do not over tighten them, it will damage the screws and the screw heads.
I dont know about you guys but I find it pretty funny that were strapping 700grams of metal onto our delicate CPU core and Scythe want us to be careful for the kamakazes screw heads. Anyway, humour aside, if I followed Scythes instructions to the letter I probably would be forking out for another 2500+. Figuring out how much to tighten the screws is the trick to attaching this heatsink, and the instructions are not really on the right track. What I did was turn each screw a few rotations, holding the screwdriver in the screw head fairly loosely, then switch to the other side. When the screwdriver slipped out of the screw head the first time, I tightened each side another couple of full rotations then tried picking up the unit. The motherboard (which was on the ironing board at this point) rose up, I slowly pulled it up and held it in place vertically; everything appeared to be fine so I left it at that point.
Reading other reviewers experiences on installing the cooler I found Im not alone; every other reviewer has criticised the retention system. Personally I actually like it over the traditional clip, its the first unit Ive been able to install in my system without removing the motherboard or power supply and doesnt require too much fiddling with flatheads and hoping like hell you won't scratch your pcb. I won't hold the new retention system against the unit in general, but I believe Scythe should seriously reconsider the installation instructions.
Testing Overview
Testing Rig:- Abit NF7-S Rev. 2.0
- AMD 2500+ (week 30)
- 2 x Geil Ultra Performance 256MB PC3500
- Gigabyte 9600pro
- Passive heatsink on the north bridge
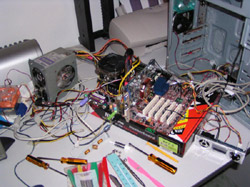
The motherboard was run out of a case, as the following picture depicts:
All temperatures were recorded with a Coolermaster Aerogate 2 at a room temperature of 28.5 degs. This temperature was verified with a traditional mercury thermometer which was in sync with the Aerogate. The temperature did not vary more than half a degree from this temperature and all results were taken within a 2 hour time period. Each heatsink base was first cleaned with Methylated Spirits and a lint free cloth before installation. The CPU had a fresh application of arctic silver 3, applied evenly at each test, but not to an optimal thickness as I would do during a permanent installation.
Load temps signify temperatures recorded after running Prime 95 for 15 minutes. Idle temps are those recorded while the computer sat in the BIOS menu for 5 minutes. There were no fans or air conditioning running and with the windows closed, there was no air flowing through the room. The volcano 9 base had been lapped, which made a performance increase of around 2 degrees at best. The thermal probe was placed between the heatsink base and the cpu, about 2mm away from the core.
A fail result means the heatsink failed to keep the motherboard from shutting down the computer as it believed the CPU was at 65degs (this was actually around 62degs according to the thermal probe). RPM measurements were recorded from the BIOS.
Performance

Starting at stock speeds I was sorely disappointed with the Kamakaze on its lowest available fan speed out of the box. Admittedly it kept the CPU running okay with literally no audible noise in a 28 degree room with zero airflow, but it came very close to getting to my critical heat level during load. Turning the fan reveals a different story: the Kamakaze is very well suited at dissipating heat when theres a bit more air flowing through those pins. It managed to keep the CPUs temperature down substantially more from its idle temperature than either of the other coolers.

Raising the core voltage to 1.75 we see a similar performance result. At the lowest fan speed the Kamakazes results are appalling, with the cooler not able to even to keep the CPU at an acceptable temp whilst idling. Crank up the fan to see a different story, the Kamakaze manages to keep the CPU temperature under full load the same as the volcano 9 idling.
Conclusion
For a quiet cooler I am very impressed with the performance of the Scythe Kamakaze. It managed to keep my CPU at a decent temperature during the middle of summer and I look forward to using it to see how far my 2500+ can go this coming winter. The cooler attaining this level of performance whilst remaining inaudible against my case fans is a welcome change over my aging volcano 9 rated at 54+db on high speed. At around $60 the unit is a bit more expensive than others, however I would have no problem recommending it to anyone who would like to replace their current cooling with something a bit quieter whilst maintaining their current clock speeds.
Thanks to Tier 2 Systems who supplied the unit for testing.
|
|
Advertisement:
All original content copyright James Rolfe.
All rights reserved. No reproduction allowed without written permission.
Interested in advertising on OCAU? Contact us for info.
|

|