|
|
|
|
|
CoolerMaster AquaGate Liquid Cooling System |
|
Join the community - in the OCAU Forums!
|
Waterblock and the LCU
The two major components of the AquaGate Liquid Cooling System are the brushed aluminium box that is the Liquid Cooling Unit, and the water block made of copper and acrylic.
The Waterblock:
The water block included with the AquaGate is well engineered and beautifully finished. The bottom section is made from copper, about 4mm thick, about 70x50mm in area and its base is smoothly machined. As you can see in the photograph below (click to enlarge), the internal surface of the copper block features a number of central channels or fins and a bumpy finish to increase the surface area, turbulence and hence heat transfer abilities.
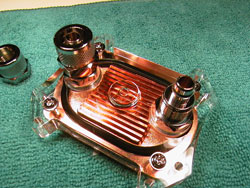 
the bottom of the copper block is really very smooth - shown with protective plastic still attached
The top part of the waterblock is made from clear acrylic and is approximately 10mm thick. A rubber o-ring has been used to create a tight seal between the two parts of the block. Two screw-on chrome barbs are integrated into the acrylic to create a tight and leak-proof connection.
The waterblock design and included fittings allow it to be mounted on a number of different CPUs. The raised central bump allows for the attachment of a simple metal spring-clip for mounting on Socket A/462 (AMD Duron, Athlon, AthlonMP, AthlonXP) CPUs. This setup uses the usual mounting lugs on the CPU socket so I would expect it to work with Socket 370 (Pentium 3 and Celeron) CPU's although this is not mentioned in the manual.
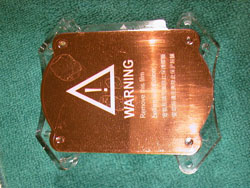
Unlike a number of similar cooling kits, the AquaGate package includes the components for two other types of CPUs. Two sets of mounting holes in the acrylic part of the waterblock and two additional block mounting retention sets allow the AquaGate be used on either Socket 754/940 (Opteron, Athlon 64, Athlon 64 FX) or Socket 478 (Pentium 4, later Celeron) processors. Each block mounting retention set includes a top plate that holds the top of the waterblock in place, a set of spring-screws and a back plate and insulating card that are positioned under the motherboard.
The LCU:
The Liquid Cooling Unit or LCU is the heart of the AquaGate system. The LCU contains the pump, radiator, reservoir and cooling fan, all neatly enclosed in an attractive looking brushed aluminium and chrome steel enclosure. The LCU measures about 147x85x205mm and is designed to be used in one of three mounting configurations: externally, internally in drive bays or internally in a PSU space.
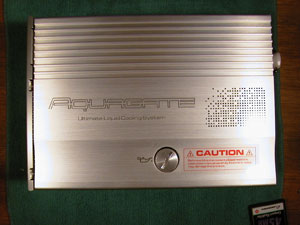
The LCU can be run as an external unit. The included tubing allows the LCU to be positioned anywhere within about a meter of the PC and the water pipes are easily routed out the back of the chassis using the included PCI bracket. The default configuration incorporates the LCD module as part of the LCU unit and a D-bus cable connects from the PCI card to the back of the LCU. An external AC power cord is also required to power the pump.
Perhaps the most logical home for the Liquid Cooling Unit is to mount it internally in two 5.25" drive bays. This configuration allows all the components to be kept inside the system, creating a much neater looking setup. The water pipes can be cut to a short length, the external pump power cable routed through the back of the PCI bracket, and the D-bus cable connected to the internal port on the PCI card.
The LCU can be also mounted internally into a redundant power supply mount (using the included bracket) if you happen to have a large tower case that has an second PSU mount. CoolerMaster's own Stacker case, recently announced, has an extra PSU space at the bottom which would presumably accomodate the LCU. The LCD control panel can be removed from the LCU and mounted in a spare 5.25 drive bay so you can see it while the LCU is mounted in a PSU space at the rear of the case.
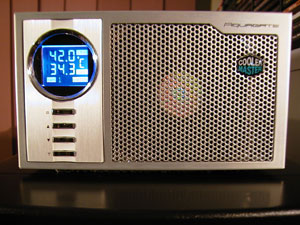
The LCU and incorporated LCD module mounted externally on the top the case; this was the configuration for most of our tests.
The LCD module also has 4 push-button function controls. The bottom button changes the display between degrees Celsius or degrees Fahrenheit, the top button changes the function selected and the middle two buttons are up and down. The function button allows four adjustable settings to be changed; Set temperature (for both the CPU and water reservoir), fan speed and shut down time. The shut down time allows you to specify how long the AquaGate will wait before turning the system off - via the power on/off motherboard header - in the case of an emergency. The default shutdown time is 30 seconds, but can be varied between 0 and 100 in 5 second intervals.
The manual seems to be a little confused about the Set temperature function: although the heading says Setting the CPU Alarm Temperature the text indicates that the function is To set your optimal CPU temperature. At first I thought the setting may adjust the fan or pump speed according to the CPUs temp, but given that it actually shuts down the system when the alarm temperature is reached, its a safe bet to call it the alarm temperature. Shutdown alarms can be set for both the CPU and water probe temperatures.
The LCD display and the alarm temperature controls monitor the temperature in 0.1 degree intervals. This means that you need to press the up or down button 10 times just to change the alarm temperature by 1 degree, and is probably overkill. The AquaGates alarm and emergency shutdown function can be triggered in one of four different ways: CPU temperature, as measured by the included thermal probe; water tank temperature, as measured by the internal probe; coolant level, as measured by the internal float; or if the 80mm fan fails. In the case of an alarm, the LCD will flash and the system will emit a moderately soft, but still noticeable beep-beep sound, and the system will shut down after the pre-set interval is reached.
|
|
Advertisement:
All original content copyright James Rolfe.
All rights reserved. No reproduction allowed without written permission.
Interested in advertising on OCAU? Contact us for info.
|

|