Installation, Software, Configuration
Installation:
Installation of the card was a breeze, after downloading the Australian version of the software, installing the drivers and plugging the card into a vacant PCI slot. A barrage of no less than 8 "Windows logo compatability" annoyances appeared, but contrary to microsoft's hot air, my computer did not explode, nor did the universe collapse... this time. Be warned, though, that installing software that has not passed windows logo testing is a bad idea on mission critical or production machines. If in doubt, use a backup program to secure your data and be safe, not sorry and probably grumpy - nobody likes a grumblebum. Installation of the card itself has never been a source of problems, I've installed the card on 3 computers, two WinXP Pro machines a P4 2.4 and a P4 1.8, and a Win2000 machine, an Athlon TBird 1.4 and it works like a charm, it also works fine with rounded ATA cables, because I'm sure someones going to ask about the transfer capacity of them. It might work better without them, but I'm too busy watching TV to try.
To install the remote, open up the driver installer package and select "FusionDTV remote", click blindly at "next" for a few seconds. After the installation completes, plug in the remote receiver to a spare USB port, restart your machine and all the software should be working harmoniously. I won't cover the software installation further; it's simple, straightforward and well documented in the manual.
Plugging in the Antenna:
The antenna to most people's TV's is in the lounge room, while most people's computers are NOT in the lounge room - this poses a problem. We need to extend the antenna cable, and extending antennas can be tricky at best as the signal degrades over every metre it is sent through. Our house had an ancient antenna that we stopped using about 7 or 8 years ago when cable TV first became available, so in order to get enough signal to our computers, we cut off all the old wiring and installed RG6 cable right from the antenna to both computers, and we also put in an amplifier/splitter from Dickie Smiths. That said, we also live in a valley and have always had poor TV reception, your mileage may vary. If all else fails you can call an antenna guy to wire it up for you, but don't be a sook - go DIY:
Crash Course in Wiring up an Antenna:
Buy some RG6 cable, you might be able to get it by the metre, but nuts to that, we bought a 100m roll of it for $60 at J.R Turk electrical supplies. Bargain! You will also need a cable cutter to go with it, and some connectors - there are plenty of tutorials on the net for making cables so I'll leave that up to you. If you're not a handyman, pop down to Dickies and grab some pre-made lengths of RG6, some connectors, and a 2 way splitter, plug it all in and run the cables through the house, ghetto style. If there's sufficient interest I will make a complete how-to on wiring up your house.
Fusion Signal Checker:
Handy dandy signal checker! No.. really! It's great! Let it scan around for channels, and then tell it to check the strength, it will tell you exactly how strong a signal is. Not really much to explain, but its good for testing, seeing of one configuration of cable results in a better signal or not. The graph updates every second and you can select each of the channels that are pre-saved by the main program, or it can scan itself.
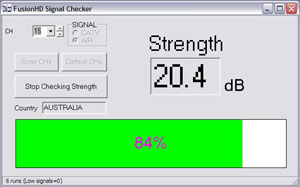
the signal checker's main and only window
Fire up FusionHDTV!
On startup, if it pops up and warns that it cannot connect to overlay mixer, close any programs such as media player or explorer windows that are previewing a movie, and start FusionHDTV again.
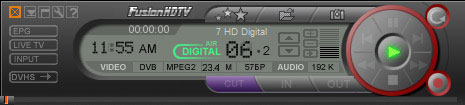
FusionHDTV main window
When you start it for the first time, it asks if you would like to scan for channels now, if you want to watch tv, click yes, otherwise, click no and stare at a black box until you're ready. :) The auto scan window plods through and scans for channels. It should detect at least 5 streams:- Seven Digital
- Nine Digital
- Ten Digital
- ABC Digital
- SBS Digital
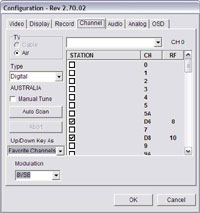
The channel configurator.
But those are only for where I live in south Sydney - you will have different channels depending on where you live. Again, check out these websites for more info: Digital broadcasting Australia and the Australian Broadcasting Authority.
Each Transport stream has subchannels, usually a single SD stream, a single HD stream, and an EPG. To add these to channels that you can flick through with the buttons or on the remote, add them to your favourites.
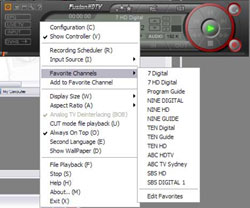
the right-click menu of fusionHDTV, including the favorites menu
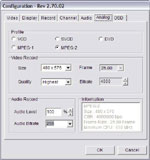
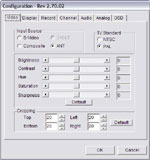
Configuration brings up the config panel, recording scheduler opens up the recording scheduler, input source lets you choose between DVB, composite and S-Video inputs, favorite channels is your list of favorite channels, the display size lets you choose the size of the display window (from 480x270 to 1920x1080 and full screen) aspect ratio lets you choose whether to use to original aspect, 16:9, 4:3 letterbox or 4:3 pan and scan (these can be changed on the fly by the remote) deinterlacing cant be turned off, cut mode file playback lets you watch a pre-recorded transport stream and slice it up into little bits. Second language lets you choose between audio streams on HD broadcasts that have them, show wallpaper sticks the tv window on the desktop, and file playback opens the open file dialog box. Fair enough!
|


