|
|
|
|
|
Intel's MatrixRAID Examined |
|
Join the community - in the OCAU Forums!
|
Setup and Configuration
DECIDING THE RAID USAGE SCENARIO AND ARRAY SIZE
Before the user can set up RAID they must enable the ICH6-R embedded RAID controller in the motherboards BIOS.
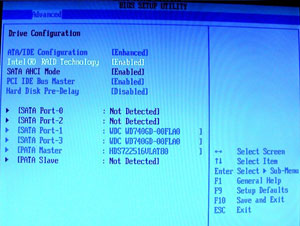
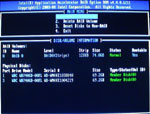
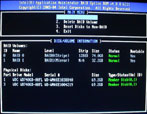
Only then will the ICH6-R BIOS ROM pre-boot screen appear. Native command queuing and SATA hot plugging as well are only available when the embedded RAID controller is enabled. The RAID BIOS ROM GUI shows the hard disks connected to the four ICH6-R SATA channels - in our case two WD740 Raptors. At this stage the user has to decide about his RAID usage scenario. We decided to install Windows XP and a few essential applications as well as important data files on the RAID 1 array. This way the system remains operational in case one of the two hard disk fails. Non important applications like games will be installed on the RAID 0 array. This array will be mainly used as working space for editing huge graphic or video files. Other users might opt to have the Operating System installed on the faster RAID 0 array to take advantage of the faster loading time this will provide. It is important to have a clear usage scenario in mind before arranging the arrays, because it determines their size. In our case we have 2 x 74 GB hard disk available which gives the entire RAID volume in theory a capacity of 148 GB. In reality its a few GB less for overheads. Video files are sometimes exceeding several gigabytes. Therefore we decided to use around 80 GB for the RAID 0 array, with the remaining space for the RAID 1 array. The next step in setting up the RAID 0 (or RAID 1) array is selecting 2 disks and the RAID stripe size. The optimal stripe size is a constant topic of discussion among RAID users. We strongly recommend to follow Intels advice and select a stripe size of 128 KB for best hard disk performance when applications are running. All our tests showed that 128 KB indeed give the best performance when running applications. A smaller stripe size of to 16 KB gives often better transfer rates in benchmarks like Sandra or WB99, but this is not reflecting real word performance. The recommendation for 128 KB is only valid for Intels ICH5-R and 6-R - other RAID controllers might work better with other stripe sizes.
ARRANGING MATRIX RAID IN ICH6-R RAID BIOS ROM
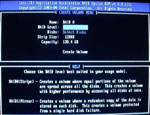
A MatrixRAID volume comprises one RAID 0 and one RAID 1 array. These two RAID arrays can only be arranged consecutively, not at the same time. However, it doesn't matter which array is created first. We started with the RAID 0 array by selecting 2 disks, selecting RAID level 0, allocating 80 GB, selecting a stripe size of 128 KB, and finally naming the array "RAID 0". It is not mandatory to name the arrays, but doing so makes it easier to identify them later in Windows Disk Management.
 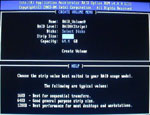 
After this is done (and without rebooting) the user can stay with the RAID 0 array and install the OS on it, or continue to arrange a RAID 1 array, taking advantage of MatrixRAID. The RAID 1 array is created on the same two disks used for the RAID 0 array. We allocated the entire remaining capacity of 148 GB - 80 GB = 68 GB to the RAID 1 array and named it "RAID 1".
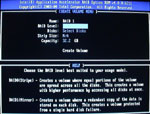 
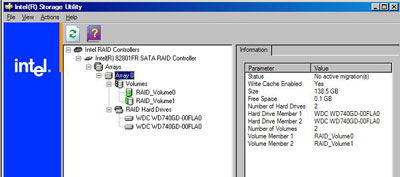
After this is done we see a total MatrixRAID volume of 80 GB for the RAID 0 array and 34 GB for the RAID 1 array. The RAID 1 array comprises 2 x 34 GB. Why are only 34 GB visible and what happened to the disappeared 34 GB? This is because the second half of the RAID 1 array is the "mirror", a complete copy of all data on the visible 34 GB. The mirror is visible only to the system and kept hidden and inaccessible to the user.
In line with our usage scenario the OS will then be installed on the 34 GB RAID 1 volume. As always when the operating system is installed on a RAID array, the RAID controller driver must be loaded and installed from a floppy disk. This process is initiated by hitting the F6 key at the beginning of the Windows XP installation process. After booting into Windows we see a 34 GB drive (RAID 1) containing the operation system and in Disk Management will we find an un-partitioned 80 GB drive (RAID 0). Its now up to the user how to partition the remaining space, where to install applications, store data and temporary files. For monitoring the MatrixRAID volume the IAA software should be installed. We will later demonstrate why this is a must when the user wants to take full advantage of MatrixRAID automatic repair capability in case of a disk failure.
ARRANGING MATRIX RAID FROM WITHIN WINDOWS XP
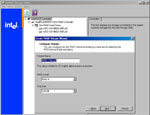
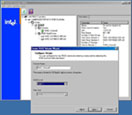
Another way to arrange a MatrixRAID volume is through Intels IAA program. The user can arrange RAID from within Windows XP by using this software. This is particularly useful if Windows XP is already installed on one disk and the user wants to arrange a RAID volume by adding a second hard disk. Previously this could be done only through the above described BIOS ROM set-up. All data on the involved hard disks were erased in the process and Windows and all applications had to be re-installed. Even with the ICH5-R it was possible to migrate Windows and all other data on an existing hard disk into a RAID array. This is a greatly time saving feature. The ICH6-R and the latest version of Intel Application Accelerator software now also allow arranging a MatrixRAID volume from within Windows XP.
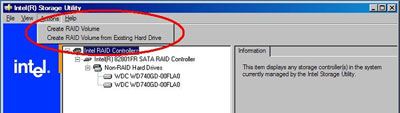
The logic of arranging the MarixRAID arrays follows exactly the same steps as with the BIOS ROM set-up described above. The only difference is that the hard disk with the already existing Windows installation has to be merged into the RAID 1 array. Setting up RAID within an existing Windows installation takes more time than with the BIOS ROM, because the data on the originating hard disk where the operating system is installed has to be migrated onto the RAID array.
 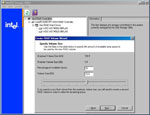 
To migrate around 40 GB of data on the originating hard disk took around 15 minutes for us. This is much faster and convenient than re-installing Windows and all applications after the RAID array has been set up by BIOS ROM.
It goes without saying that the ICH6-R RAID BIOS has to be enabled and the ICH6-R RAID driver has to be installed before the IAA software can be used.
|
|
Advertisement:
All original content copyright James Rolfe.
All rights reserved. No reproduction allowed without written permission.
Interested in advertising on OCAU? Contact us for info.
|

|