|
|
Advertisement:
|
|
DIY Subwoofer |
|
Join the community - in the OCAU Forums!
|
Cutting the panels
Here's the sizes of the pieces of MDF we're going to cut.

First up we need to cut our sheets of MDF. You need to cut 4 pieces of part "A" and 2 pieces of part "B". Parts "A" are the sides of the box and parts "B" are the top and bottom.
You'll get 2 of these pieces from each of the sheets of MDF you bought from Bunnings. You don't need to cut the width (450mm), only cut the lengths. We save a lot of cutting time by using these pre-cut sheets and that's why I've listed them. You only need to make 6 cuts for your 6 pieces of MDF we're going to use for this unit.
I used a mitre saw for this. You can also use a circular saw, jigsaw or panel(hand)saw to do it. Just keep those cuts nice and straight and you'll have no problems whatsoever putting the box together.

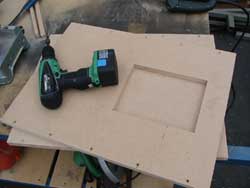
Now that we've got all our pieces cut we're going to drill some evenly spaced pilot holes along the LONG (500mm) edges of 2 pieces of part "A" and all around (all edges) of both part "B" pieces. The centre of these holes should be 9mm in from the edge of the sheet. I've also countersunk the holes so no screwheads stick up later on.
Along with this we also cut out the hole for the Sub Amplifier module in one of the pieces we just drilled pilot holes in. The Sub Amp module will have an instruction sheet that came with it telling you exactly how large the hole is that you need to cut. If you only have the bare minimum of tools then the way to accomplish this is to drill a 10mm hole in each corner of your marked hole and use your jigsaw to neatly cut along your lines.
If you want your woofer speaker in the front of the box rather than the bottom as I did then follow the next instructions making your cut in the other part "A" piece that you drilled pilot holes in.
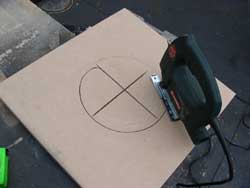
I want the Woofer pointing down so to do that grab one of our part "B" pieces. Find the centre of that piece and mark out your hole using your compass. Cut your hole using the same method you cut out the hole for the subwoofer amp. Again, the speaker will come with a size for your hole. If all else fails, use your tape measure!
Now all the cuts are done we just have to glue and screw it together. Using glue is advisable as you don't want any little gaps for air to be pushed out making for some annoying little noises now and then when you turn the bass right up!
|
|
Advertisement:
All original content copyright James Rolfe.
All rights reserved. No reproduction allowed without written permission.
Interested in advertising on OCAU? Contact us for info.
|

|


