![[Main Page]](http://www.overclockers.com.au/wiki/skins/common/images/wiki.png)
Adding / Extending your LAN/ WLAN
(Difference between revisions)
(Created page with "Copied from here with Permission from pete y testing (#4641): http://forums.whirlpool.net.au/forum-replies.cfm?t=1802277 '''Extending LAN / WLAN''' Below are the many ways yo...") |
|||
| Line 148: | Line 148: | ||
| − | Please refer | + | Please refer to the Whirlpool Link for any updates. |
| + | |||
| + | |||
| + | |||
| + | '''WAN Bypass Mode''' | ||
| + | |||
| + | '''Step One''' | ||
| + | Identifying ip addressing range (primary router) | ||
| + | The first thing we need to do is identify the DCHP IP address of the primary router. | ||
| + | To do this connect your computer to the primary router and allow it to connect as normal, ensuring it can connect to the internet. | ||
| + | Click on start and click run | ||
| + | Type "cmd" (without the quotation marks) | ||
| + | Click ok, When the cmd window opens type "ipconfig" | ||
| + | Your connection information should appear | ||
| + | |||
| + | Take note of the following and write then down as they will be needed shortly | ||
| + | • ip address = | ||
| + | • subnet mask = | ||
| + | • default gateway = | ||
| + | You can now close the command window and disconnect the computer from the primary router | ||
| + | |||
| + | |||
| + | |||
| + | '''Step Two''' | ||
| + | Changing address of the secondary router and disabling dhcp | ||
| + | Power up the secondary router, but do not connect it to the primary router as of yet. | ||
| + | Connect your computer to lan 4 port on the secondary router and allow it to connect. | ||
| + | Connect to the web UI of the secondary router (see your secondary routers user manual for details of how to access). | ||
| + | In the web UI you need to change the routers lan gateway address, usually this will be something like 192.168.1.1 or 192.168.0.1 or even 10.1.1.1 etc. | ||
| + | We need to change it to the same ip range of the primary router. | ||
| + | So if for example your default gateway of the primary router is 192.168.1.1 | ||
| + | We then change the secondary routers ip address to lets say 192.168.1.240 | ||
| + | and save. | ||
| + | |||
| + | Then go to the DHCP section of the secondary router and click the radio button etc that says enable/disable DHCP server, ensuring the DHCP server is disabled. | ||
| + | Save changes and apply. | ||
| + | Disconnect your computer from the secondary router, and power off both the secondary router and your computer. | ||
| + | |||
| + | |||
| + | |||
| + | '''Step Three''' | ||
| + | Bypass WAN | ||
| + | With the primary router connected to the internet and working correctly: | ||
| + | Connect a standard ethernet cable from Lan1 port on the Primary router to Lan 1 port on the secondary router and power up the secondary router. Connect your computer to lan ports 2, 3 or 4. | ||
| + | |||
| + | You can now connect to the secondary router's UI by typing the IP address we set earlier (eg 192.168.1.240) and setup the wireless section of the secondary router | ||
Latest revision as of 10:43, 21 March 2012
Copied from here with Permission from pete y testing (#4641): http://forums.whirlpool.net.au/forum-replies.cfm?t=1802277
Extending LAN / WLAN
Below are the many ways you can extend your LAN or WLAN
Because everyones needs are different to achieve this expansion i have tried to show you all the ways it can be done and the good and bad points to each
Just a note here , none of the methods below will make your Internet faster as it is limited by the speed of your internet connection , these methods are designed to extend and in some cases make your LAN / WLAN faster but not your internet connection
so in order of how they work and how well they work i have listed the various methods , but each does have its place in a network environment and only after working out which approach is right for you should you splash the cash.
Wired Ethernet
Note : permenent hard wired ethernet must be installed by a professional
The most obvious and yes best way to extend your LAN ( local area network ) is to have wired Ethernet professionally installed throughout your house and connect all devices via this Ethernet
there are currently 2 speeds of wired ethernet , those being
10/100 mb/s
and
10/100/1000 mb/s
the latter is known as giga ethernet
now for most average users the 10/100 mb/s ethernet is fine and will do pretty much anyone needs it to speed wise
Those that want to or have a need to transfer files across your lan or stream HD video content from one computer to another should look at using the giga ethernet option as it is far faster
network switches can be used at the end of the ethernet run to provide multiple connections for the areas where more than 1 connection is needed
network switches also come in the standard 10/100 and gigabit formats
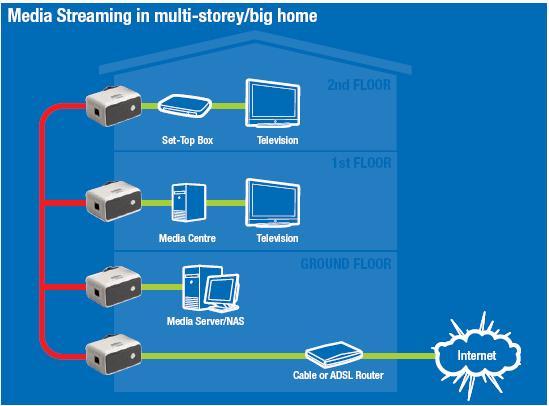
EOP ( Ethernet Over Power ) aka powerline networking
Note: many manufactures make EOP's , but i have posted the netcomm gear as i have tested and use these products , all 200M homeplug devices will work together no matter of manufacturer as long as they are the 200M series
see img in link
http://media.netcomm.com.au/public/assets/image/0018/17712/201AV_connection.JPG
EOP has become far more popular with the release of its 200M range , this 2--M range allows the EOP adapters to achieve the same speeds as 10/100M ethernet and in some cases up to 200M speeds can be achieved ( 150M being about average )
EOP works by using your power cables to transfer the signal around your house , this is a great option for those that cant or don't want to have professionally installed wired ethernet
EOP's only limitation is ether distance from one power point to another , this can reduce the connectivity and thus the throughput , or if the power points are on different circuit breakers as this also reduces the connectivity
EOP's must be used on the same phase if a house uses 3 phase power
EOP's come in various configurations
single EOP to single EOP
NP-204 http://www.netcomm.com.au/netcomm-products/powerline/np204
single EOP to 4 port EOP
np-203 http://www.netcomm.com.au/netcomm-products/av/np203
single EOP to dual EOP and WAP
np-206 http://www.netcomm.com.au/netcomm-products/powerline/np206
there are now 500M versions of EOP devices hitting the market but as yet have no long term testing or validations of how they work yet esp on Australian power points
manufactures of EOP devices
TP LINK http://www.tp-link.com.au/products/?categoryid=206
NETCOMM http://www.netcomm.com.au/products/powerline
BILLION http://au.billion.com/product/powerline.php
Wireless Bridging / repeating
Wireless repeaters extend the main wireless router or access point by connecting to the primary transmission and repeating this transmission thus extending the wireless range
there are 2 distinct way that wireless repeating works
WDS – wireless distribution system
see img in link
http://www.wireless-router-net.com/wp-content/uploads/2009/08/wds-point-2-point.gif
This is the original way to extend the wireless coverage , wds works by linking one or more wireless ap's or router via their mac addresses , the coverage become transparent and wireless clients roam between access points at will
The down side to conventional WDS is the security method is limited to WEP and all devices and routers / access points must use this wep security , wep security is now not known as very secure and can easily be hacked , but if security isnt an issue this is a very functional transparent way to expand your WLAN
Some new devices claim to be able to use wpa and even wpa2 in wds modes but these devices are very limited and must be used with same manufactures and compliant devices thus limiting its use greatly
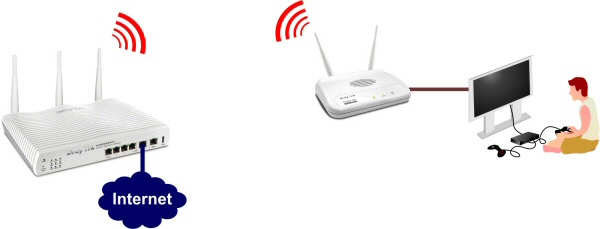
Wireless Bridge – also known as client bridge or station mode
see img in link
http://www.broadbandbuyer.co.uk/images/products/DrayTek/AP700-modes-station.jpg
Some devices have the generic ability to be run as a wireless client and for all purposes act as if they where a wireless adapter and connects to the primary AP via wireless , this allows the devices to use any security method to connect to the ap's including wpa2-psk with aes security ( this being the best security method currently available )
Wireless Bridges allow computers or devices to connect to the ethernet of the wireless bridge and be able to then connect to the rest of the LAN or internet through the bridge , the wireless bridge its self becomes transparent as if each device is connected directly to the main ap
Wireless Repeating – universal repeater / repeater modes/ range extenders
see img in link
http://www.wireless-router-net.com/wp-content/uploads/2010/03/28-wireless-repeater.jpg
Wireless repeaters generally are used to take a signal transmitted from a main access point and retransmit this signal thus extending the wifi signal
wireless repeaters like wireless bridges can connect to any access point security including wpa2 , the main downside to wireless repeating is the repeater must stop receiving the wifi signal so it can then retransmit this signal , this need to stop actually halves the throughput to those devices connected to the repeated signal
The other downside to wireless repeaters is the wifi is far less transparent to that of WDS mode and in most cases you must manually switch between the main ap signal and the repeated signal as windows tends to try and hold on to its current connected signal to the very last b4 it will swap to the alternative signal of the repeater
wireless coverage
wireless coverage can be effected by many issues , these can objects , metal surfaces , mirrors , tin , brick etc etc , so placement of your router is essential the closer you are to it the better it will work
your coverage is also effected by the amount of other wireless routers and other devices in your area
in general the 2.4 gig wifi has been around for a long period of time and thus most wifi users are on the 2.4 gig spectrum , with more and more users adopting 2.4 gig wifi the spectrum has become quite congested
the solution to avoiding this congestion is to move to the newer 5 gig wifi range as there are far less users on the 5 gig
upside to 5 gig
greater throughput when close to the transmission
downside to 5 gig
less coverage in standard house environment compared to 2.4 gig with the same saturation levels
for general type households only look at 5 gig as an option if you have very bad saturation from other users or you can locate the wireless router close to your comp or device
Please refer to the Whirlpool Link for any updates.
WAN Bypass Mode
Step One Identifying ip addressing range (primary router) The first thing we need to do is identify the DCHP IP address of the primary router. To do this connect your computer to the primary router and allow it to connect as normal, ensuring it can connect to the internet. Click on start and click run Type "cmd" (without the quotation marks) Click ok, When the cmd window opens type "ipconfig" Your connection information should appear
Take note of the following and write then down as they will be needed shortly • ip address = • subnet mask = • default gateway = You can now close the command window and disconnect the computer from the primary router
Step Two Changing address of the secondary router and disabling dhcp Power up the secondary router, but do not connect it to the primary router as of yet. Connect your computer to lan 4 port on the secondary router and allow it to connect. Connect to the web UI of the secondary router (see your secondary routers user manual for details of how to access). In the web UI you need to change the routers lan gateway address, usually this will be something like 192.168.1.1 or 192.168.0.1 or even 10.1.1.1 etc. We need to change it to the same ip range of the primary router. So if for example your default gateway of the primary router is 192.168.1.1 We then change the secondary routers ip address to lets say 192.168.1.240 and save.
Then go to the DHCP section of the secondary router and click the radio button etc that says enable/disable DHCP server, ensuring the DHCP server is disabled. Save changes and apply. Disconnect your computer from the secondary router, and power off both the secondary router and your computer.
Step Three Bypass WAN With the primary router connected to the internet and working correctly: Connect a standard ethernet cable from Lan1 port on the Primary router to Lan 1 port on the secondary router and power up the secondary router. Connect your computer to lan ports 2, 3 or 4.
You can now connect to the secondary router's UI by typing the IP address we set earlier (eg 192.168.1.240) and setup the wireless section of the secondary router