|
|
Advertisement:
|
|
Asetek WaterChill |
|
Join the community - in the OCAU Forums!
|
Components Continued
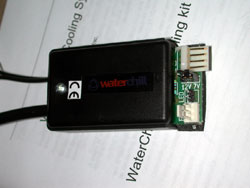
Control Unit:
This is the brains of the kit. It has 2 power inputs, one using a floppy-drive power connector inside the case and the other receiving power from outside the case - more on that later. The Control Unit provides power to the pump motor via a hardwired connection as well as the fan on the radiator via a normal 3-pin plug. It has a jumper for choosing 7v or 12v supply to the radiator fan as well as a place to connect a status LED. You can switch between 12v and 7v mode while the unit is running by moving the jumper over, so I'm sure that running a switch to the front of your PC would be possible, giving you a little more convenient access. That way you could easily switch the system to 12v mode before maxing out your CPU in a game and switch back to 7v for lighter duties like websurfing or email.
Radiator and Fan:
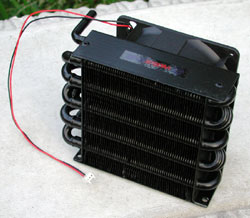 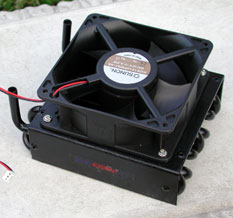
This of course is where the heat from your CPU, carried through the water, is expelled into the ambient air. Air is forced through the radiator by a 120mm Sunon fan. It's interesting to note that there is no shroud or spacer involved - the fan is connected directly against the side of the radiator. You will sometimes see on a radiator that the fan is kept an inch or so away from the radiator in a sealed shroud, which helps eliminate the "dead spot" of still air behind the centre motor of the fan, as well as lowering noise by not having the fan blades whipping around so close to the radiator fins. Not so in this case, presumably to keep the overall size of the unit down and to reduce cost. In 12v mode this radiator and fan emit a noticeable but not irritating whoosh, while at 7v they are virtually silent.
Note that the radiator does not use the quick-fitting connectors seen elsewhere in the system. Instead, you slide the hose over the relevant tube on the radiator and use a supplied collar clamp to secure it by crushing the "ears" of the clamp with some pliers. This was the first source of leaks when I assembled the system. On the inlet side, the hose is quite loose and you have to really crush the clamp down hard to seal the joint. On the outlet side the hose is tight enough by itself - you have to soften it up in warm water before you can put it over the connector tube - but use the clamp anyway for extra security. Once both are clamped down firmly I found they sealed very well.
Overall the radiator is quite a bulky unit, with the hose-connectors on one end adding even more width. The fan is mounted to suck rather than blow air through the radiator, so ideally you want the non-fan side facing an area with cool ambient air. In most tower cases you could mount the radiator at the lower front of the case, where there's usually a case intake fan anyway. You could also install it at the back of your 5.25 drive bays if you had 3 to sacrifice. Asetek recommend drilling 4 holes in your case and using four provided screws to mount the radiator, but that's a little permanent for me - I used nylon cable ties (or "zip ties") instead.
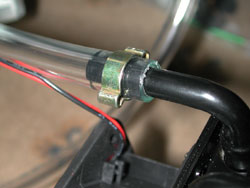
Pass-through Power Cable:
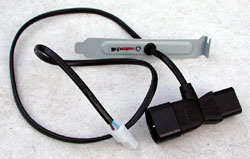
Asetek provide what they call a "hermaphrodite cable" - enough sniggering down the back there - but I prefer the term "parasite connector" or the more common "passthrough connector". Regardless, this handy cable keeps the system mostly tucked away inside the PC case. It connects to your power supply and your normal power cable connects to it. At the other end of the cable is the connector to power the WaterChill pump and roughly in the middle - it's adjustable - is a slot cover through which the power cable passes. This is quite a neat way to ensure that the pump is always turned on with the PC, presuming the internal plugs stay connected, while keeping the external appearance of the PC tidy.
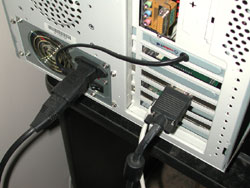
Note that we're using a Yeong Yang cube case, which has an unusual rear layout. On a normal tower case the power cable won't be looping around the way it is in the picture above.
One important thing to note about this kind of cable is that the parasitic connector will have power even if the PSU is turned off. So, turning your PSU off isn't quite enough to ensure there's no power inside the PC - you should disconnect the power cord completely from the back of the passthrough connector (but don't disconnect the passthrough connector from the back of the PC, leaving it connected to the power cord, or there will still be power connected.)
Water Tubing:
Included in the kit is a 1M length of 12mm tubing, which runs from the pump's outlet to the radiator inlet, and 1M of 10mm tubing, which is used to connect the waterblock to the radiator and the reservoir return. You will have to cut the 10mm tubing because 2 separate lengths are needed - you will probably end up cutting both hoses to length regardless, to keep the system neat and without too much extra length for the water to flow through. It's fairly unexciting clear plastic tubing, but you could perhaps substitute some UV-sensitive or otherwise more interesting hose if you preferred.
Two metres is more than enough for one system - I used less than half of the 12mm tubing - but if you did mess up your measurements and get the lengths wrong, there's not really enough provided to re-do it all. Fortunately, this kind of tubing is easy to find at aquarium shops or hosing suppliers. It's also not as flexible as I would have liked, making some angles a little awkward during installation. Asetek say that they use this particular tubing to avoid the problem of hydrolysis, which is where water reacts chemically with the tubing. Apparently some of the softer tubing is more susceptible to this. I also think that using a firmer hose makes it less likely that you will bend it into angles that could cause the hose to collapse, restricting flow rate and in extreme causes over-pressurising connectors and causing leaks. You could always use "elbow" connectors to carry the water flow around a sharp bend if you had to.
Misc Bag:
This small bag contains the hardware needed to mount the waterblock to various types of motherboards, be they SocketA (AthlonXP, Duron), Socket423 (P4, Celeron) or Socket754 (Athlon 64). There are also some WaterChill stickers to stick to your case so people know how extreme you are and a small length of wire, used to power up your ATX power supply without needing your motherboard to be present, for the filling and leak-testing phase of assembly.

One of my earliest claims to fame was being quoted in New Scientist magazine, expressing my view that a dash of cheap vodka in the water was an easy way to stop green slime from growing in the tubing of your watercooled PC. Asetek make note in several places in the manual that their system will not tolerate such abuse and that alcohol and other solvents can damage it. Hence they also provide a small bottle of anti-algae solution - I guess we'll just have to drink the vodka instead.
|
|
Advertisement:
All original content copyright James Rolfe.
All rights reserved. No reproduction allowed without written permission.
Interested in advertising on OCAU? Contact us for info.
|
|