|
|
|
|
|
Asetek WaterChill |
|
Join the community - in the OCAU Forums!
|
Waterjacket, Assembly
Waterblock:
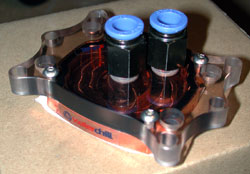
This attaches to the motherboard and presses against the top of the CPU, carrying heat away in the water that runs through it.

There's no fancy maze of passages, grooves or pins as seen in some other waterblocks to maximise surface area, simply an open space with a vane separating the inlet port from the outlet. Asetek say that this decision was made after testing a few different designs and finding this layout more efficient than a maze design. Cool water enters the block via the centre port and must flow around this vane to exit via the offset port. Centre-entry is the preferred design for many blocks because it means the cool water is immediately presented to the metal above the CPU core for maximum cooling.
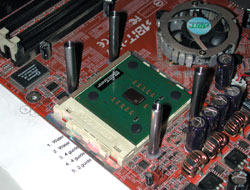
Mounting the waterblock onto the CPU is the most complex part of the whole arrangement. On the SocketA side of things, which we were using for testing, you need to use the 4 motherboard mounting holes. If your motherboard doesn't have them, you're out of luck. As with any cooler that mounts using these holes, you will have to remove the motherboard from the case to install it.
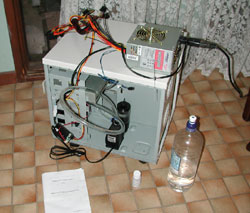
Any watercooled system should be run for 24h to ensure there are no leaks, before connecting it up to your PC components. Asetek actually suggest mounting the waterblock on the motherboard during this phase and admittedly a bit of water on your motherboard will probably not really do it much harm while it's powered off, assuming you clean it off any contacts before corrosion occurs, but I prefer to not risk it. So, I ran the system for 24h by itself in the case with only the PSU present - tucked out of the way on top of the case:

I actually ended up cutting out most of the tubing between the pump and the reservoir, so it's a lot more direct in that picture above. I did find during my initial testing of the system that there were a few leaks. However, they were largely my fault. For example, there was a trickle from the quick-fit connector at the top of the pump. My fault, because I had not been forceful enough in inserting the tubing into the connector. When I really pushed it, there was another centimetre or so of movement - and from then on it was sealed. The 10mm connector on the radiator leaked also, but again because I had not crushed the clamp tightly enough. The manual could perhaps make it clearer that the required force to connect some of the components is quite substantial.
So, once satisfied that there were no leaks in the system, it was time to mount the waterblock onto the CPU and install the motherboard into the case. I have a new AthlonXP 1800+ DLT3C CPU and watercooling seems a good way to find out if they're as good at overclocking as everyone seems to be saying at the moment. My current motherboard of choice on the SocketA side is ABIT's NF7-S v2.0 and they should be a great combination for overclocking.
Anyway, in brief, you use a screw and plastic washer on the back of the motherboard to hold a metal rod and plastic washer in place on the front side - one through each mounting hole.

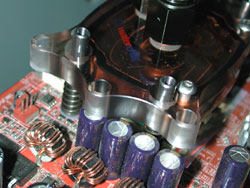
These 4 rods go through the waterblock and there is a hand-screw fitment you thread into the top of the rod. Between the motherboard and block, and between block and screw-tightener, there are springs to ensure correct tension on the CPU by the block. Unless of course, your motherboard doesn't obey the height restriction standards for the area around the SocketA, in which case this happens:

At this point, you are basically out of luck. There's no way this motherboard can be used with this WaterChill socket. There are other motherboards with this problem - Asetek place the blame for this squarely at the feet of the motherboard manufacturers, referencing Page 11 of this AMD document. They have even created a PDF file which we have hosted here, with some images showing how the Asetek block fits into the space allowed by the standard. There is some more info on this Asetek page. Despite all this, Asetek are aware that some motherboards simply won't be compatible with the existing waterblock, so they have produced another lid for the waterblock which will be compatible with all motherboards with the 4 mounting holes. This lid is provided with a tool to make removing and reinstalling the lid on the waterblock base simple, while maintaining the watertight seal. This lid is now being shipped with the kits but can also be purchased separately.
I continued testing this block with another motherboard, but Asetek will be sending me the more compatible CPU waterblock lid soon, along with their northbridge and GPU attachments for this kit, which will allow me to build the system around the NF7-S and perhaps a Radeon 9800 Pro for some nice numbers.
|
|
Advertisement:
All original content copyright James Rolfe.
All rights reserved. No reproduction allowed without written permission.
Interested in advertising on OCAU? Contact us for info.
|

|


