|
|
Advertisement:
|
|
Xice ExternalCool Watercooling Kit |
|
Join the community - in the OCAU Forums!
|
Installation
While the Xice manual suggests "the change of your system from air to watercooling is done in minutes without additional work on your PC", allowing an hour to set it up and up to 24 hours to test is probably a more realistic estimate. Having said that, the setup and installation of the ExternalCool system is very simple and straight forward; it's really just a matter of installing the waterblock, connecting the tubing and filling the reservoir with fluid.
The two pieces of black plastic tubing provided with the ExternalCool kit, each about 2m long, are difficult to kink or compress, but still easy to bend into the required shape. At 6mm, the internal diameter (8mm external) is a little smaller than is often found in many water cooling setups, which could be an issue if you wanted to mix-and-match the Xice kit with additional water cooling components. While the smaller diameter tubing may have an adverse impact on the water flow rates, as we noticed see when we opened up the ExternalCool, it may actually have a beneficial impact on the systems cooling ability, by providing a greater surface area to cool.
Personally I would have preferred some sort of transparent tubing that would allow visual inspection of the water flow. The Xice kit does not provide any kind of flow measurement device or alarm, and given its silent nature it is often hard to determine if the pump is working as it should. Its also impossible to check the tubing for any trapped bubbles; however, the design of the water reservoir should be sufficient for this not to be a major problem.
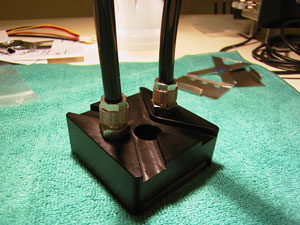
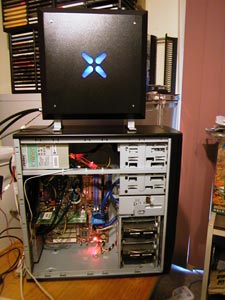
The first step in assembling the kit is to attach the tubing to the barbs on the top of the waterblock. While the manual indicates that simply hand tightening would be sufficient, I felt the need for making it nice and snug with a pair of pliers. The manual also indicates that the watercooling setup should be assembled and plugged in - but the xpk not mounted - until it has been tested sufficiently to ensure there are no leaks. Given the nature of the system - there are only 4 connections that need to be made water tight, and only 2 of them are inside the PC - and the nature of our test system, I did not feel this was required, and installed the kit directly into the PC without testing. The ExternalCool was so easy to setup and use that after running the setup for several weeks I encountered no difficulties or problems at all.
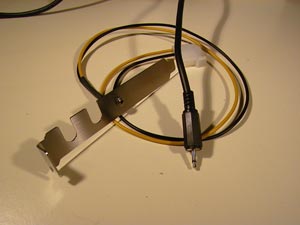
Xice supply a PCI bracket that serves two functions. The first thing it does is to provide power for the ExternalCool unit. Internally 12V is supplied by the PC's PSU, to the PCI bracket's plug via a non pass-through, molex connector. The ExternalCool's power-jack then plugs in to the socket on the outside of the PCI bracket. Two cut outs on the bracket are provided to allow for easy routing of the water tubing from the inside of the PC out to the ExternalCool.
The cutouts in the PCI bracket provide ample room to easily route the water pipes from inside the PC out to the ExternalCool. However, it would have been nice if Xice provided some sort of rubber grommet to protect the tubes and prevent any compression or pinching, which could be an issue on some PC cases.
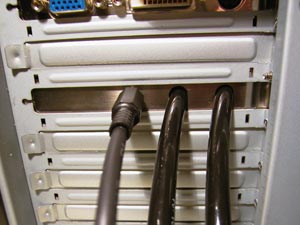
When the xpk has been mounted and the tubing routed out the back of the PC, it's simply a matter of plugging in the ExternalCool's power cable and then attaching the correct pipes to the base of the external unit. Three different Xice manuals indicate the correct water flow directions, but it was not too difficult to decipher that the ExternalCool's outlet (left hand side) needs to be fed to the inlet of the waterblock (on the left when viewed from the top), and then from the outlet of the waterblock to the inlet of the ExternalCool.
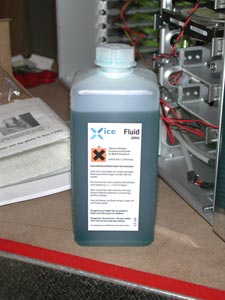
Xice supply a 500ml bottle of "Xice Fluid (2084)" with the ExternalCool kits. The green fluid is a mixture of deionized water and 30% Ethanol, designed to provide corrosion protection for the combined copper/aluminium setup. Xice advised that we should replace the liquid we lost due to in-transit spilling with deionized water, readily available from the supermarket.
Xice's manual indicates that during first use, and while the system is flushed of all air bubbles, that the ExternalCool unit be placed above the rest of the system. When the PC is first powered on, the 150ml of fluid that the reservoir holds initially holds is quickly drawn into the pipes and waterblock and needs to be refilled several times before the setup procedure is completed. In total the entire 500ml bottle of coolant fluid is required to fill the entire system.
|
|
Advertisement:
All original content copyright James Rolfe.
All rights reserved. No reproduction allowed without written permission.
Interested in advertising on OCAU? Contact us for info.
|

|