|
|
|
|
|
Winbond DDR400 Mega Test |
|
Join the community - in the OCAU Forums!
|
Testing Methodology
How to Test System Memory
Memory testing is done by checking data integrity at randomly selected areas of the memory (addresses) with various test patterns, like walking through every single bit in ascending and descending order, random jumps, copying blocks of data as well as checkerboard patterns. The more addresses are tested and the more patters employed the better, but the longer it takes. After each test run a report is generated indicating a fault-free run or the faulty addresses. There are basically 3 ways in which memory can be tested:
| Type | Example | More Info | | Windows based | Memtest | here | | Non-memory resident self-booting | Software resident in self-booting PCI card | RST-Pro from Ultra-X, Inc | here | | Software running from boot floppy | Memtest-86 | here | | Goldmemory | here | | Motherboard-independent testing device | EUREKA from CST | here |
The first option is the least attractive: if an operating system is running, the area of memory containing the OS or reserved for the OS cannot be tested correctly. The workaround in a situation like this is to alternate DIMMs between two memory slots since the operating system will be loaded onto the higher (Win9x) or the lower number DIMM (all other operating systems). Thus, by switching DIMMs back and forth between slots, one DIMM can always be kept free of the OS which, then allows complete testing of the module. The natural drawback is that every DIMM has to be tested twice which can be rather time-consuming. (quote from Lost Circuits here.) Hardware testing devices can be very expensive, and the advanced hobbyist might therefore settle for one of the software based solutions that run outside the OS.
How We Tested
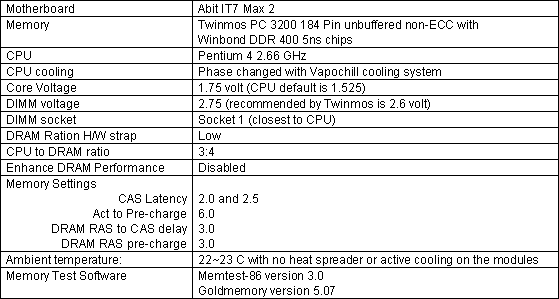
A Pentium IV 2.66 is air-cooled good for around 20 x 160 MHz = 3200 MHz as shown in our recent IT7 Max 2 article. Setting the CPU:DRAM ratio to 3:4 would allow for a maximum memory frequency of 213 MHz. In order to increase the theoretical frequency headroom for our test modules we used a Vapochill cooling system, which allows the 2.66 to run up 20 x 185 MHz as shown in the same IT7 test report. By this we widened the maximum possible memory frequency headroom to 245 MHz and made sure that the CPU would not become the limit for the memory.
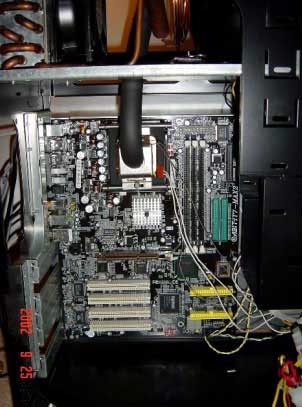
Vapochilled IT7 Max 2
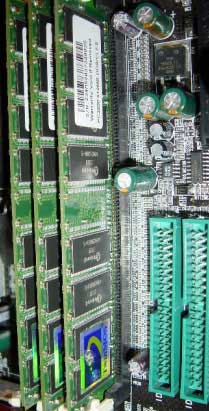
IT7 max 2 with all DIMM sockets occupied with Twinmos PC 3200 512 MB modules
Regarding voltage: we tried all available voltage settings the IT7 has to offer (2.5-2.8). We even flashed a modified IT7-II BIOS, which let us increase the DIMM voltage above the original BIOS maximum to 3.2 volt. We found that the best impact is achieved with a BIOS setting of 1.80 volt, which effectively gave a read-out of 1.75 volt, as the IT7 is slightly undervolting. Any voltage higher than this did not improve stability or the frequency headroom and is anyway dangerously out of specification.
After our initial tests runs we tightened the memory settings and found that most modules were (when single) running with the most aggressive DRAM settings of 2-5-2-2 at least at 210 MHz. Changing DRAM RAS to CAS Delay and DRAM RAS Pre-charge from 3 to 2 gives around 2% more bandwidth, but this impact is more than off set by the reduced FSB frequency necessary to run the memory with these settings. We also found that the RAS to CAS Delay setting should be handled with care. 2 times we got corrupted data and had to restore the Windows registry after trying to increase the FSB/DRAM frequency with the RAS to CAS Delay set to 5. We did anyway not notice any positive impact on bandwidth and we recommend keeping it at 6 or 7 at all times.
To test our 8 Twinmos PC 3200 memory modules we used Memtest-86 and Goldmemory. Both programs came out best in this comparison of memory testing utilities. We ran first Memtest-86 and then re-tested with Goldmemory. In a few cases we found Goldmemory to report faults when Memtest-86 attested a fault free run. As condition for fault-free operation the module had to withstand 3 runs with both testing programs. One run with the Goldmemory base- test alone takes almost 1 hour. Memtest-86 needs around 5 minutes for a 256 MB stick.
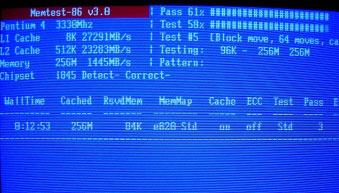
3 completed Memtest-86 test runs with a 256 MB module at 20 x 167 = 3330 MHz and the memory in 3:4 at 223 MHz
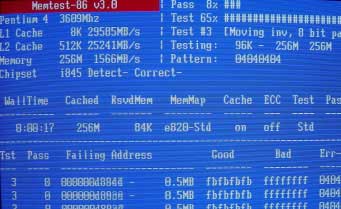
Failed Memtest-86 test run with a 256 MB stick at 20 x 180 MB = 3609 Mhz and the memory at in 3:4 at 240 MHz
We did not use the SANDRA memory benchmark to attest for a fault-free run. Taking the fact that a Sandra memory benchmark could be completed as evidence for the tested modules fault freeness at this frequency would be grossly overestimating the quality of this module. One of our 256 MB Twinmos PC 3200 modules for example could be benched with Sandra at 244 MHz, but could only complete the Memtest and Goldmemory tests at 220 MHz, because it is possible to take a SANDRA memory benchmark with a highly unstable system. As a rule of thumb we estimate that the maximum frequency under which Sandra would run has to be reduced by around 20 MHz to get sustained fault free test runs with Goldmemory and Memtest-86.
It goes without saying that our test results are only INDICATIONS which do not approach professional memory testing standards. Furthermore: Using software for testing leaves always the possibility that the overclocked system is generating false positive results, that is when errors are reported which did not occur.
|
|
Advertisement:
All original content copyright James Rolfe.
All rights reserved. No reproduction allowed without written permission.
Interested in advertising on OCAU? Contact us for info.
|

|


