|
|
Advertisement:
|
|
CoolerMaster Wavemaster TAC-T01 Case |
|
Join the community - in the OCAU Forums!
|
Firstly Id like to start off by saying that when I first saw this case, I was thinking WOAH! The curved bezel and shiny brushed finish just floored me. Being a graphic designer by trade, I was always envious of Mac machines as they were always beautifully presented, even if they don't live up to their looks. Having been used to ugly beige boxes all my life, I finally took the plunge and bought the WaveMaster. Suffice to say, I have yet to be disappointed.
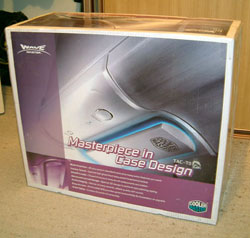
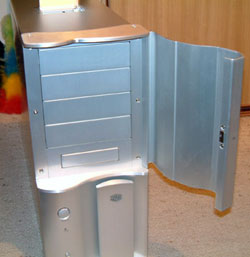
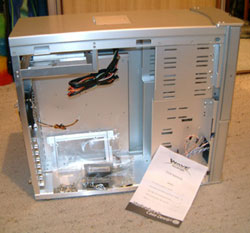
The WaveMaster was well packaged and contained adequate instructions on how to install your components. Once it was out of the box, I was surprised that it actually looked as cool and beautiful as was advertised in the pictures (a rare thing these days). The obligatory twist test was used to check for rigidity. It passed with flying colours as I couldnt get the case to twist a single bit. A quick run of my hand around each edge revealed no sharp edges either. Funnily enough though, I sustained a few minor cuts on my hand which I could possibly attribute to the box as paper cuts.
 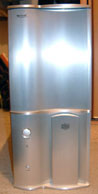
I noticed that apart from using thumbscrews to secure everything at the back, the front door was magnetically secured. While the magnetic force isnt strong, it still does the job of keeping the door shut. The door itself felt heavy and being constructed of solid aluminium, I can see why!
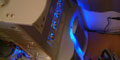
The blue LEDs in the front bezel are hidden behind a protrusion. Im not too sure what to call it yet. But in any case, the LEDs can be powered directly by the power supply using 12V molex connectors.
Having removed my Antec Trupower from my old AOpen H600A, I followed the instructions on how to attach the faceplates. Here I ran into a little trouble as the plastic bit of the power supply plug was in the way. A little repositioning and hoping, and I got it on. Pulling out the motherboard tray (another first for me), I was a little perturbed by the scratching of metal on metal as it slid out. Perhaps a little velvet or material would help that. The replacement of the tray also required a bit of force as it would occasionally get stuck.
After installing my 8RDA+ motherboard, I tried sliding it back into the case. Unfortunately the CoolerMaster Aero7 CPU cooler that I had got stuck. It seemed the clip jutted out too far and when I tried levering it slowly, the whole thing came off. Not a huge problem as CoolerMaster never really released the Aero7 in Australia. Anyone with an Aero7 would have the revised Aero7+ anyway, which is a lot shorter and doesn't foul the case.
While I think the thumbscrews supplied with the WaveMaster were an excellent touch, I would like to see longer handled thumbscrews used. Those supplied were just a touch stubby for large fingers and after screwing and unscrewing them a few times, my fingers were starting to hurt.
|
|
Advertisement:
All original content copyright James Rolfe.
All rights reserved. No reproduction allowed without written permission.
Interested in advertising on OCAU? Contact us for info.
|
|