|
|
Advertisement:
|
|
Speaker Cut-off Headphone Socket Mod |
|
Join the community - in the OCAU Forums!
|
Does having to unplug your speakers every time you want to use your headphones annoy you? Well, this quick inexpensive mod (about AUD$20) will allow you to have a separate headphone socket that, when you connect to it, disconnects the audio signal to your speakers. Some sound cards come with a special cable for this and some cases with front-mounted audio ports do for you, but if yours doesn't, here's how to make one yourself.
Firstly before I show the diagram of how it connects I have to explain a bit about the parts used. The list of parts I used is as follows.
- 1 X Double Pole Single Throw 6.5 mm Stereo Switching Socket(you can use 3.5mm if you like)
- 1 X 3.5 mm Panel Mount Stereo Socket
- 1 X 3.5 mm Stereo Plug
- 3 Meters of 4 Core Shielded Audio Cable (cut into 2 separate lengths)
- Solder
- Heat shrink Tubing
- Electrical Tape
Socket Layout:
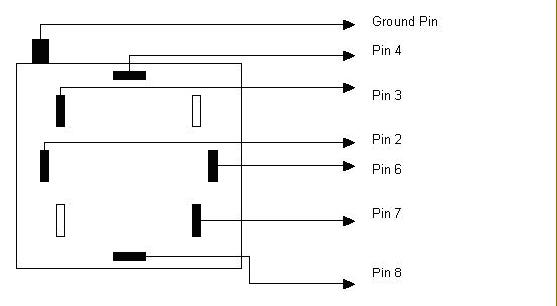
Not all sockets will have the same layout but they will operate the same way so a continuity tester may be needed to test where all the pins go (good idea anyhow). You can pick one up from Dick Smith here (search for product Q1545).
When the socket is empty the pin configuration is as follows:- Pin 4 and Pin 8 are isolated
- Pin 2 and 3 are connected
- Pin 6 and 7 are connected
When the plug is in the socket the configuration switches to the following:- Pin 4 and 8 are now connected to the plug in the socket, but not to each other
- Pin 2, 3, 6 and 7 are now isolated
As you can see from this configuration when the socket is switched (ie when a plug goes in the socket) the link between pins 2 and 3, and 6 and 7 are broken. Therefore the audio input signal will connect to pins 2 and 6, and the output to the 3.5mm Socket for the speakers to 3 and 7 so that when it is switched the signal is no longer being passed on through to the speakers. Pins 4 and 8 are connected to the plug when it is inserted into the socket, therefore the audio input signal shall be connected to these pins as well (4 and 8), hence the reason for using 4 core shielded audio cable. This cable basically has 5 wires. 4 separate coloured wires (blue, red, yellow and white) and the shielding wire (the ground), which is then all covered with another coating. This is very handy as you will soon see in the diagram. It allows me to split the input signal into to separate wires for ease of connection at the other end to the socket from the plug.
Hooking It Up:
Now that I have explained the way the socket switching works, this diagram will make a lot more sense.
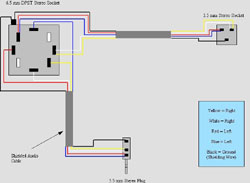
click image to enlarge
It is as simple as connecting the components up as I have in the diagram above (altering pins if need be due to different make of socket). Once you have connected it all up, connect the plug to the speaker out connector on your soundcard, then plug your speakers into the standard 3.5 mm stereo socket and you will hear sound through your speakers like normal. Plug in your headphones (to the switching socket) and voila! The sound is cut off from the speakers and now comes in to your headphones.
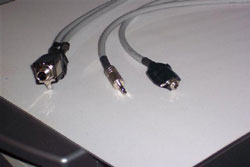
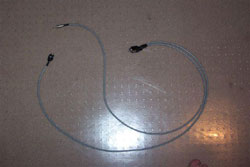
Here are a couple photos of the finished product!
If you require any more information shoot me an email. Enjoy!
Like modded PC's? Check out the latest entries in the PC Database Gallery!
|
|
Advertisement:
All original content copyright James Rolfe.
All rights reserved. No reproduction allowed without written permission.
Interested in advertising on OCAU? Contact us for info.
|
|


