|
|
|
|
|
Connectland 5.25 LCD IDE Mobile Rack |
|
Join the community - in the OCAU Forums!
|
Installation, Operation, Conclusion
INSTALLATION
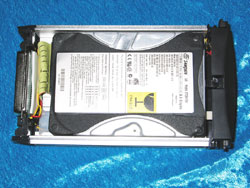
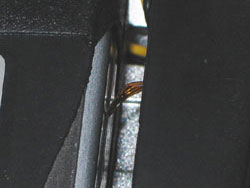
Physical installation is a simple task, no more difficult than installing a cd-rom drive. The Frenglish installation guide has clear diagrams showing the steps involved, although most people I suspect will have little need for it. The HDD is placed in the caddy and connected to the internal Molex and IDE connectors, then screwed into place with the supplied screws. There are no dip switches or jumpers for setting the drive as master or slave so these will need to be set on the drive before installing it into the caddy. Once the drive is in the caddy, the thermistor can be seen to touch to front of the drive chassis. The accuracy of measuring drive temperature using this method is questionable and I would have preferred the thermistor to be on a lead wire. This way I could choose which part of the drive I wanted to measure the temperature from.
 
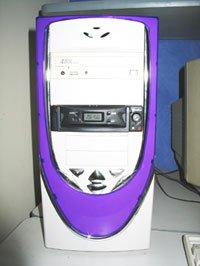
The rack slides neatly into a spare 5.25” drive bay and is also screwed into place. It is about the same length as a normal cd-rom drive so almost any case should have no trouble accommodating it. One thing I did notice is that the locking handle on the front of the caddy sits flush with the rack. If the rack is mounted flush with the front of the case, it is very difficult to lift the handle. I ended up mounting the unit slightly forward from the rest of the system. This might not bother most people but could be a nuisance for those who are fussy about the look of their case. Once the rack is screwed into place, the Molex connector and IDE cable need to be plugged in as with any other IDE device. Time to boot it into action.
OPERATION
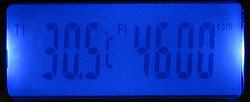
Upon first boot, the LCD showed no sign of life and my drive was not detected by the BIOS. Panic then set it. It was at this stage that I remembered the keylock had to be in the LOCKED position for the device to operate. Power off, lock, power on, and things were looking good. The system booted without a problem, the HDD activity light flickered away and I was soon at the Windows desktop. The defaults for the alarms are set to 45°c for temperature and 1000RPM for the fan. The fan is very quiet and once mounted in the case is was inaudible. Out of the case it was still a very quiet fan running at a brisk 4500RPM. The LCD display is a blue backlit type. It is very clear, and brighter than it appears in these pictures. The viewing angle is especially good with a clear view to about 140°.

Setting the alarms is also a simple process. Press and hold the “Mode” button for 2 seconds to enter the temp alarm setup screen. From here, pressing the “Set” button will change the temperature at which the alarm will sound. The temperature range for the alarm is from 40°c to 80°c in 5°c increments. The full range for the thermistor is from 30°c to 90°c.
Pressing the “Mode” button again will take you to the fan alarm setup screen where the “Set” button is used to set the RPM at which the alarm will sound. The alarm range is 1000RPM to 5000RPM. The fan sensor will read speeds ranging from 0RPM to 9900RPM. Pressing the “Mode” button for 2 seconds once more returns the display to the normal operation mode.

I tested the temperature sensor by placing a similar external probe next to the internal one. After an hour of playing Battlefield 1942, the internal sensor read 32° while the external one read 35°. Close enough to be within a reasonable margin of error. When either the temperature or the fan speed exceed their preset alarm points, the alarm will emit a high pitched beep-beep-beep sound for 30 seconds and the corresponding indicator on the LCD will flash. This was tested by using Agg’s highly scientific method of sticking an object between the fan blades. After the alarm has triggered, a press of the “Reset” button will stop the noise and the flashing display. The fact that the alarm only sounds for 30 seconds is of concern. It is not a very loud alarm. It should be at least twice as loud as it is now. If the user is out of the room it could easily go unnoticed. It would then require someone to actually look at the LCD display to realize that there was a problem. Apart from this, the entire setup and operation procedure is very straight forward and no problems were encountered.
CONCLUSION
I quite like this unit for what it is, but I do have some complaints about it. The ability to have an alarm sound when something goes wrong or when things get too hot is a great advantage, but it becomes useless if the alarm is inaudible or if you are not around when the alarm sounds. In my opinion, the alarm needs to be louder and sound for longer. Another point is the thermistor would be more useful if it were on a lead wire and could be placed on some other part of the hard drive. Also, the locking handle is difficult to access if the unit is mounted flush with the rest of the system case.
One other point to note is that mobile HDD racks are pretty useless unless you have at least two of them, or at least two of the racks to mount the caddy in. Unless you simply want to be able to remove the drive from the machine for security reasons, these things should be bought in pairs or with two of the mounting racks. A separate extra rack doesn’t seem to be an option with this model.
Overall, the Connectland Aluminium 5.25” LCD IDE Mobile Rack does all that it claims to do. The unit looks good and the build quality is very good with the caddy fitting firmly into place inside the rack yet remaining easy to remove when unlocked. The locking mechanism works well. The fan seems to provide a fair amount of airflow and the aluminium chassis will aid in keeping your drives cool. The LCD display is clear and bright, as well as being nice and blue. The fan speed and temperature sensing seems to be accurate. This is not a low-budget featureless rack, so the street price of about AUD$110 doesn't seem too excessive. If you are in the market for some removable storage, several of these would probably do you well. In short, a very nice bit of kit.
Thanks to Peridyme, the importer and wholesaler, for providing the review unit. There's a list of retail outlets here on their site.
Check out the latest Gallery entries in the PC Database!
|
|
Advertisement:
All original content copyright James Rolfe.
All rights reserved. No reproduction allowed without written permission.
Interested in advertising on OCAU? Contact us for info.
|

|


