This project came about because of what I consider to be exorbitant prices for the premium mouse mats on the market at the moment. They are just a piece of plastic, they should cost virtually nothing.
So I found something WAY better. :)
What you will need:
1 x Non-Stick Frying Pan ($12 to $25 for a cheapy)
1 x Electric Drill and Drill Bits
1 x Jigsaw with aluminium cutting blades (I went through 2)
1 x Smooth Bastard File
2 x Packs of mini rubber feet (Jaycar, pack of 4) $2 ea.
A few different grades of Wet and Dry sand paper
And .. 1 to 2 hours depending how good you are at this sorta stuff.
Disclaimer: If you happen to sever any appendages or do some otherwise bone head thing to yourself too bad, this aint splitting the atom sorta stuff.
Ok, lets get started.
1. Take one TEFAL 32cm Non-Stick Frying Pan (K-Mart $20)
Other brands of Non-Stick Pans have varying types of surfaces. Some are a more uniform grey and have what can best be described as a rippled texture. The TEFAL as shown has an almost black surface that when viewed closely appears to have a silver glitter in it, I assumed an optical mouse would track better on this surface. It is also the smoothest surface of all the ones I looked at.
2. Drill a hole from the underside of the pan big enough to allow you to start a jigsaw from. Then cut the base of the frying pan out. There is quite a convenient pattern printed on the bottom, just cut to the printed outer ring.
You can see where I drilled the hole.
3. Once you have the base removed use a smooth bastard file to make the edges nice and clean and free of burrs. Once I had it smooth I used some 220 grit Wet and Dry and sanded the edges smooth under running water.
4. I bought 2 bags of small rubber feet from Jaycar and stuck them around the edge of the pad at the end of every 4th point on the printed design. Make sure you clean the surface well before hand. I used Isopropyl alcohol, but methylated spirits would do just as well.
These are the smallest feet Jaycar had and they were too tall. So I trimmed them down after sticking them on.
To make sure they were all the same height I got two nails and cut the heads of so they lay flat and used them as a guide with a sharp knife.
I used a bit of spit on the blade to give it a bit of lubrication seeing rubber is quite sticky to cut. :)
The height is pretty good after trimming.
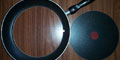
And that completes the project as you can see below. I use my Microsoft Wireless Optical on it and it is sooooooo smooth. I cant imagine this surface will ever wear out from the friction from mouse feet.
If youre more creative I suppose you could make it some shape other than round, but sounded like way too much work for me.
If anyone has any questions, feel free to contact me via my OCAU forum account.
Advertisement:
All original content copyright James Rolfe.
All rights reserved. No reproduction allowed without written permission.
Interested in advertising on OCAU? Contact us for info.