So the hardware was done - it was time to improve the looks! As you can see from the previous page, the original looks were terrible. First try: It was one simple side window with a hole for my VGA card.
Second try: I made a new window and a blowhole on top with a 12cm fan guard on it.
Later I found some blue Plexiglas that looked cool. I made a window for the left side and a top window from it, put some lights in it, put on top the 12cm fan guard, printed a nice picture for the front. I had it like this for almost half a year. It was nice. :)
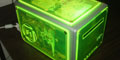
Now I have rebuilt my cover and the front of the case because of all the votes on my PCDB entry. It made me sure that the looks of my computer was no good. :) So I bought some green UV acrylic to make the windows and the front. Later on I was reading on a Dutch forum an article that someone engraved a drawing on his UV acrylic. That I liked. It took me 6 hours to engrave my 3 windows.
On the left window I have engraved a picture of The Snarf, the cat from thunder cats, and cut out the logo of our company F1 Computers. On the top: Beaker from the Muppet Show and on the right side Garfield! I put in two 10cm UV lights to let it glow in the dark.
I also made a simple intake tube for my PSU to lower the temperature of my whole system even more. Its now running at full load CPU 46º and PSU 51º and I like that! :)
In this last picture you can see the inside of the computer.
Thanks for reading my story about my Shuttle project. I hope I made you a bit interested to modify your own computer or barebone.
All original content copyright James Rolfe.
All rights reserved. No reproduction allowed without written permission.
Interested in advertising on OCAU? Contact us for info.