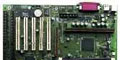
Introduction, Features, Layout
Description : Intel ATX BX Slot1 Mainboard for Pentium II, III, Celeron
Manufacturer : AOpen - Taiwan http://www.aopen.com.tw
Manufacturer's site for this product: AOpen AX6BC Pro
Revision: Standard (non-Gold version), bios v1.05
Price : AUD $205 from eyo - $210 from computermarket.
Availability : Very good - many stockists
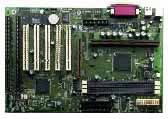
Features:
Slot 1, 16 FSB's (66.8, 68.5, 75, 83.3, 100, 103, 112, 117, 124, 129, 133.3, 138, 143, 148, and 153MHz), 3 DIMM sockets (384Mb max), 5 PCI / 2 ISA / 1 AGP, 2 fan headers, Wake on Lan, Wake on modem, SB-Link. ¼ PCI/FSB bus divider available at FSB's above 112MHz. The usual serial and parallel ports etc. No UDMA/66 support on-board.
Notes:
When I was looking to update to a Slot1 overclocking-friendly board, it basically boiled down to the AOpen AX6BC or one of Abit's offerings such as the BH6 or BX6v2. The AOpen was reputedly more stable, while the Abit's had overclocking-friendly features like BIOS-selectable core voltage. It was a tough decision. Fortunately, while I was puzzling over it, AOpen released their first motherboard to include core voltage (v-core) adjustment in the BIOS - this was based upon the excellent AX6BC board and called the AX6BC-Pro. The decision was made.
The core voltage can be raised in +0.1V steps to a maximum of 2.2V for 0.25 micron cpu's. Core voltage adjustment is also supported for both 0.18 micron and 0.35 micron cores, to a maximum of 0.2V over specification. There are no negative voltage steps available. If you're using a socket370 CPU, you could always use a slocket such as the MSI 6905 v1.1 which allows you to adjust the voltage further. This is a lot less convenient than just going into the BIOS..
FSB speeds are also selected via the BIOS, with speeds of 66.8, 68.5, 75, 83.3, 100, 103, 112, 117, 124, 129, 133.3, 138, 143, 148, and 153MHz available. Bus multiplier ratio is selectable from 1.5 to 8.0 times FSB. The PCI divider is fixed at ½ for FSB speeds below 100MHz, fixed at 1/3 for FSB speeds between 100 and 112 inclusive, is selectable between ¼ and 1/3 for FSB speeds between 117 and 129 inclusive, and fixed at ¼ for FSB speeds from 133MHz upward. It would have been nice to have full control over this divider - maybe Aopen will make this available in their i820 boards.
As with all BX mainboards, the AGP/FSB bus speed ratio is selectable between 1:1 and 2:3. Unfortunately this setting is available only via a jumper block on the mainboard, and not via the Bios. The jumper location leaves a little to be desired also, as it is placed against the last DIMM socket, and is not the most accessible jumper on the board. However this is not too much of a problem, as it is rarely changed once set. There is also an AUTO setting for the AGP divider, where the circuit looks at the B21 (66/100) pin of the cpu to determine the appropriate divider ratio. This is often the cause of problems for inexperienced overclockers, as the mainboard ships with the jumper set to AUTO - if you drop a slot1 Celeron in and crank the FSB to 100MHz, the AUTO setting will cause the divider to run at 1:1. There are not a lot of AGP cards out there that will run happily at this speed! Often the result will be a failure to boot, or crashes within 3D applications, and it is usually misinterpreted as the cpu's inability to handle the speed. With socket370 CPU's in a slocket this is not normally a problem. Still, it would've been nice to see the setting in the BIOS.
The board's main criticism comes in the areas of floppy connector placement, hardware monitoring capability and FSB selections (more info below under "overclockability"). The floppy disk connector has been placed at the rear edge of the board, normally requiring the floppy cable to be run over/around the cpu. Personally, I find it better to loop the cable over the back of the board and run it underneath - this helps with airflow through the case too. I suspect this has been done to allow the unusual placement of the power-supply cable, though. This is a long way from the CPU slot, which is a good thing, because where there's power there's heat, and those big cables also block airflow around the CPU badly on some other boards. Obviously AOpen has paid attention to ways to maximise stability with this board.
As far as hardware monitoring goes, the board is equipped with only a single thermistor located at the base of the slot 1 connector. No additional thermistor headers are provided, and the monitoring hardware is incapable of reading the thermal diode within the cpu core of S370 Celeron's etc. The hardware will monitor voltages and fan speeds, however none of the data is reported within the Bios - data is only available from a program like MBM or Hardware Monitor. Both fan headers report RPM's, but only 1 can be controlled via software (to lower the RPM's or stop the fan during powersave etc).
The quality of manufacture is typical AOpen - excellent - with good quality components throughout and this is reflected in the excellent stability of the board.
|