|
|
|
|
|
Cooler Master AquaGate Mini R120 |
|
Join the community - in the OCAU Forums!
|
Introduction, Installation, Usage
About a year ago Wolfy reviewed Cooler Master's AquaGate liquid-cooling system. That unit fared pretty well, but like most kits of that era it's a little fiddly to install. You need to cut hoses to the correct length to run between waterblock, pump, radiator etc, carefully fill the unit with liquid, connect various sensors and power connectors etc etc. For a novice, this kind of approach can be daunting and outweigh the advantages of a liquid-based cooling system when compared to some of the high-end heatsinks.
The advantages of liquid-cooling are well known. For some general info, see the watercooling page in OCAU's Wiki. The automotive industry shows how widely accepted the idea of liquid-cooling is, with only a very small number of air-cooled vehicles still in production. We haven't yet reached that level of acceptance in the PC market, even among enthusiasts, but one way of getting closer to that goal is to make the liquid-coolers as easy to install as a high-end heatsink.
That seems to be the main design goal behind Cooler Master's latest kit, the AquaGate Mini. The idea is that you can take this cooler from the box, install it on your CPU, mount the radiator and power up your now cool and quiet PC. No filling is required as the unit comes pre-filled. No cutting lengths of tubing either, it's pre-assembled. No fancy sensors or fiddly power connectors are required either, with the whole unit driven from a single 3-pin-fan connector, like a conventional heatsink's fan. If the performance of this unit is up to par, you'd have to say it's a compelling way to get liquid-cooling to the masses.
In The Box:
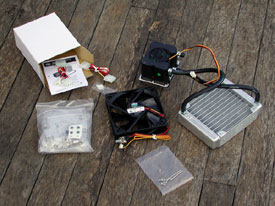
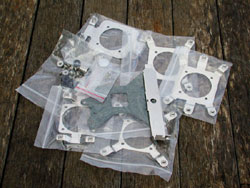
Inside the nice briefcase-like box we find the unit itself, a 120mm fan with speed control, a sheet of instructions, a small single-use thermal paste packet and various assorted mounting brackets and screws.
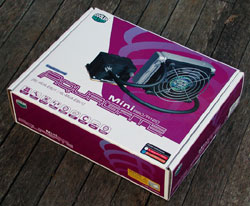 
Note that our review unit is the "R120" version, which sounds excitingly like some kind of phase-change refrigerant, but in fact refers to the 120mm fan and appropriately-sized radiator. There's an R80 version with an 80mm fan and smaller radiator if your case won't accomodate a 120mm unit.
There's an almost baffling array of adapters provided for the various types of motherboard sockets. Ahh, standards are great - there's so many to choose from! Of course Cooler Master can't be blamed for that, and they've provided mounting hardware for Socket478 (Pentium 4 / Celeron), LGA775 (P4, Celeron D), Socket603/604 (Xeon), SocketA (AthlonXP, AthlonMP, Duron, Sempron) and Socket754/940/939 (Athlon64, Sempron, Opteron). So you're pretty well covered there. There's also a PCI slot cover for the speed-control knob connected to the fan.
 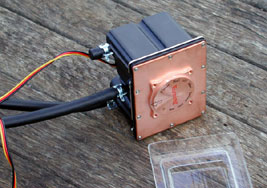
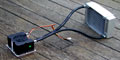
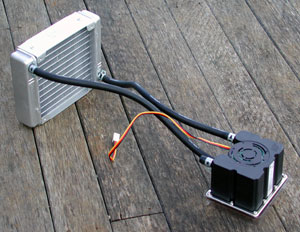
This system is so simple in appearance because the pump is built directly onto the waterblock. This unit connects to the motherboard using one of the various mounting brackets and the finely-machined copper block sits on the CPU. The hoses are held securely to the inlets and outlets with sprung metal clamps. The liquid circulates between the waterblock and the radiator, which you mount on a 120mm fan mount in your case somewhere. Ambient air is drawn through the radiator to cool the liquid before it returns to the CPU waterblock and the cycle continues.
Installation and Usage:
Installation is fairly simple, although the instructions aren't the best. The first step is to screw the appropriate mounting plate onto the bottom of the waterblock. At left below you can see the S478 plate attached. The mounting plate then attaches to your motherboard in the appropriate way. In the case of S478, the four screws go through the four motherboard holes near the socket and attach to a provided backplate. On our ABIT IC7 testbed the backplate was fouled by some SMD components on the back of the motherboard. For various other CPU types the backplate isn't used, simply using plastic washers and metal nuts to secure the mounting plate through the motherboard, so that's how I mounted it on our IC7 too.
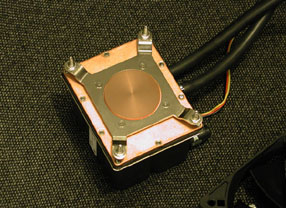 
On the S939 side of things the idea is the same, but only two screws are used. These run through the two normal motherboard holes and connect the mounting plate on the waterblock to a backing plate or just nuts on the back of the board. It's worth noting that, regardless, you have to remove the motherboard from the case to mount this cooler. For you and I this may be no big deal, but for non-enthusiasts that's a pretty daunting exercise. Still, most high-end aircoolers require you to remove the motherboard as well now.
Cooler Master provide a hex socket so you can use a normal philips-head screwdriver to wind the mounting nuts on easily. They also provide two fan adapters, so you can run both the pump and the 120mm fan from a 4-pin molex connector if you prefer. I ran both from 3-pin motherboard connectors so I could monitor the RPM. The pump reports about 2200rpm, while the 120mm fan reports approximately 900rpm to 2800rpm depending on the position of the fan-speed knob. In the slowest mode the fan is essentially silent. In fact on our S939 testbed with an old fanless PCI video card, the system was eerily quiet when powered up with the fan in slow mode - the only noise was a faint hum from the motherboard's northbridge cooler. At full speed the 120mm fan emits a dull roar, not something you'd be happy using long-term. Presumably in full-noise mode you'd be gaming with headphones or speakers booming anyway. The speed dial is analog, so you can choose a setting that suits your current requirements in terms of noise and temperature. It would be nicer if the knob was accessible from the front of the PC, however.
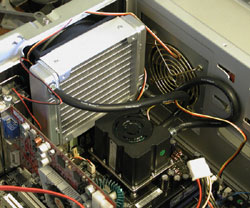
You can see that the hoses are not particularly long, only about a foot (30cm) or so. You may have even less clearance available due to orienting the radiator and avoiding kinks in the lines etc. So if your 120mm fan mount is far from your CPU socket you may be in trouble. Given this system comes pre-assembled, I guess Cooler Master had to compromise between having water lines running everywhere and having them too short. Anyway, there was no great difficulty mounting the 120mm fan and radiator in the appropriate space in the Yeou Chih server case. I did need a third hand at one point, when juggling the waterblock loosely on the motherboard, with the radiator dangling around as well.
You can mount the fan blowing in or out, with the fan on the inside or outside of the radiator. In our setup I had the fan against the case with the radiator mounted on the inside of it. This raised the radiator away from the actual wall of the case - due to the end sections it's not square, but is a rectangle and hence slightly larger than 120mm in one dimension. In our case that meant the radiator couldn't be mounted flush on the chassis wall. No biggie, as this is my preferred layout anyway, with the 120mm fan drawing cold air from outside the case and blowing it through the radiator then into the case centre. This helps alleviate a common problem with watercooled PC's, in that other components such as the video card, northbridge heatsink and motherboard power regulation circuitry are all designed with some airflow in mind. This airflow is normally provided by the CPU heatsink and fan, so when that's replaced by a waterblock you can get hot stagnant air sitting on these other components. With the radiator fan blowing into the case that's less of an issue.
I don't think weight is significant for this cooler. The waterblock with integrated pump is hefty, but it's mounted extremely securely and carries the weight close to the board. There's no large radiator section to produce leverage high above the board and no fiddly clips that might spring off in transit. Overall I'd have no problems transporting a PC with this system installed. I also didn't bother with the traditional leak-testing that you should generally do with a watercooling system. Running outside your PC will reduce the risk of problems if there are leaks in the various connections and seals of the system. Given this system was preassembled and there was no sign of leakage in the packaging, I just installed it as if it were an air-cooler.
The included fan boasts a "restart function", which allows it to "smoothly initiate a restart if the fan malfunctions". This is a fairly wishy-washy description, and I'm not sure how a fan can magically heal a bearing failure for example. Another noteworthy tidbit is that Cooler Master say "No refills of anti-icing fluid for two years guaranteed." Most liquid-cooling systems will lose coolant due to evaporation over time - even completely sealed systems will lose some via the hoses. Apparently this isn't an issue for the AquaGate Mini. It's not clear how you'd go about topping the system up anyway, and no additional coolant is provided with the kit.
|
|
Advertisement:
All original content copyright James Rolfe.
All rights reserved. No reproduction allowed without written permission.
Interested in advertising on OCAU? Contact us for info.
|

|