|
|
|
|
|
DIY HTPC Remote Control |
|
Join the community - in the OCAU Forums!
|
Software Setup, Troubleshooting and References
Setting up WinLIRC:
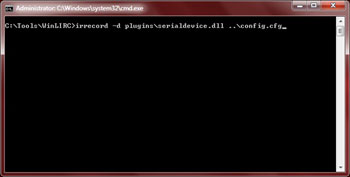
Download and install/extract WinLIRC from here. Now fire up a command prompt and change to the folder you extracted WinLIRC to. Then run:
irrecord d plugins\serialdevice.dll ..\config.cfg
Follow the prompts. When you get to the Start pressing buttons part, dots should appear on the screen with each button press:
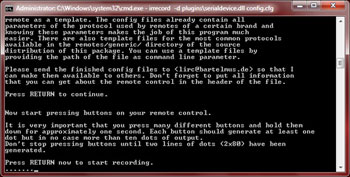
Stop here by Ctrl+Cing the program whether you manage to get dots to appear or not. If you cant get dots to appear skip to the troubleshooting section.
There are actually a number of configuration files for common remote controls available on the LIRC website the index is here. If your remote is supported, download its configuration file and place it in the WinLIRC folder. If your remote is not there, run the last command again and follow the on-screen prompts. Press the buttons as it prompts you to - irrecord should then start learning the characteristics of your remote control.
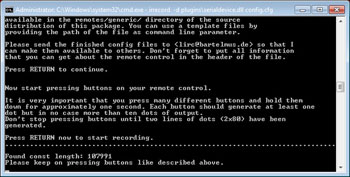
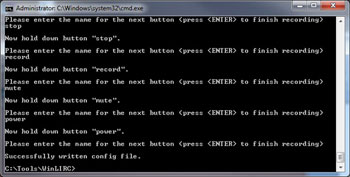
Once youve pressed enough buttons, something along the lines of the following should appear:
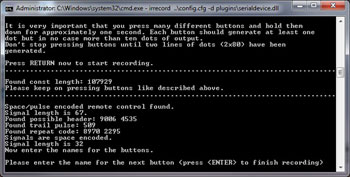
I pressed each key in sequence, named the keys in turn and eventually ended up with a configuration file I could use with WinLIRC. Its a slow and tedious process, but a necessary one. If the program aborts with Something went wrong make sure youre holding the remotes button down, and not just pressing it briefly. Once recording is complete:
Now, start WinLIRC it will tell you that it couldnt start and ask you to reconfigure it. Configure it as follows:
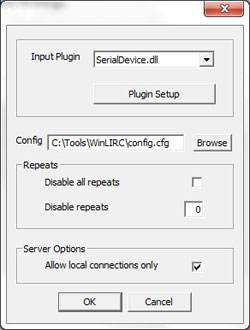 - Plugin: serialdevice.dll
- Configuration file: path and filename of the configuration file you just created/downloaded
You shouldnt have to make any other changes to the configuration. If the WinLIRC window is up, then click hide. An icon will appear in your system tray to indicate WinLIRCs status. I find that its useful at least in the initial stages, to have this icon always visible by going to Windows icon customisation and setting the WinLIRC icon to Show icon and notifications.
Add a shortcut to your startup group to WinLIRC, and set it so that the window starts up minimised we dont need to see its window.
Setting up HIP (Human Interface Programmer):
WinLIRC just interprets the signals. Now we need a program which will convert those received signals into actions and this is where HIP comes into play. Download and install HIP from here. Just install the WinLIRC plugin, and untick the Girder plugin. You dont need anything else.
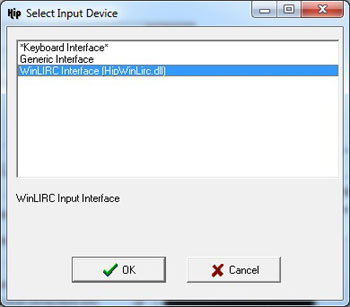
Now start HIP up. Click Next, and then click Change input device. Select WinLIRC, and click OK.
A dialog should come up containing further WinLIRC-related options. Click the Load Remote and Command Definitions button and click OK.
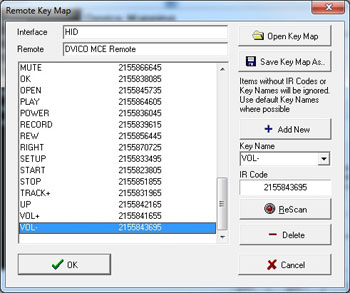
You should now be at the Device Mapping screen this is where you bind your remote controls keys to common remote functions. Click Edit Device Mapping. Click Open Key Map and see if a configuration file exists for your remote if it does, Select the file and click OK. If your remote is not in the list then you will need to do the following for every remote controls button:- Click the Add New button
- Press a remote control button and press it again to confirm
- Type in the name of the button.
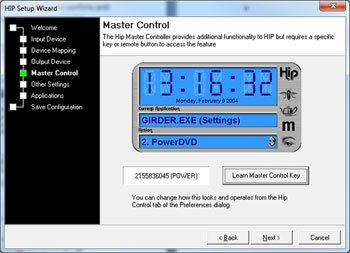
This will add the button to the list youll have to repeat this procedure for every button. Once youve completed this for all of your remotes buttons, click OK and then Next. Click Next on the Output device screen we have no output device in this case. On the master control key screen, select a button on the remote you wish to use as a master button. I selected my remotes Power button I have no other use for this button. Click learn, press your chosen button, and then Next.
Now on the other settings screen, I ticked Load automatically at system startup, and unticked Show Balloon message when Active application changes. Click Next when done.
Now on this screen, add the various programs you wish to control with HIP. Suggestions are XBMC, Boxee, PowerDVD, MediaPortal, Windows Media Center, VLC or even Media Player Classic. Me, Ive just got XBMC and PowerDVD configured. A few of the programs mentioned here include various forms of remote control support already, but I prefer just to do everything through HIP. Click Next when done. Now, choose a configuration file name and click Save Configuration, and then Finish.
Configuring your programs:
With the difficult stuff out of the way its time for the fun stuff. Here is where you map the various buttons on your remote control to actions and also where the magic happens. Right-click on HIPs icon in the taskbar, and select configure.

In my screenshot here, Ive already configured a bunch of buttons. So lets map the OK button to the Enter key on your keyboard whenever XBMC is running:- Click Add Value.
- Press the OK button on your remote, then again to confirm.
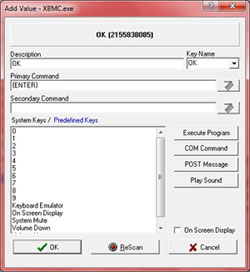 - In description, enter OK or Enter.
- Click the keyboard icon for Primary Command.
- On the Keyboard Editor screen, press the Enter key on the keyboard, and click OK.
- Click OK again.
- Click Run.
Now start XBMC (or your selected program). Press your remotes OK button if all has gone well, WinLIRCs and HIPs icons should blink green and the keystroke is sent to your program. Success! I hope...
HIP actions arent just limited to keystrokes. If you read the documentation and explore the GUI a bit, youll find out more than simple keystrokes can be sent as a result of remote control actions.
Note for XBMC and other programs:
Not all programs place as nicely when sending them keystrokes XBMC included. If you want to map the arrow keys, download this keyboard.xml file to %appdata%\xbmc\userdata\keymaps. This will allow mapping of the arrow keys, page up and page down so that you can actually navigate properly.
Troubleshooting- Check your soldering connections are OK.
- Check you have correctly cut traces as instructed.
- Check that you have soldered to the correct pins on the DB9 connector.
References:
- Serial port pinout: here.
- Serial port IR receiver schematic: here and here.
- Resistor calculator: here.
- 78L05 information: here.
- ZD1952 datasheet: here
|
|
Advertisement:
All original content copyright James Rolfe.
All rights reserved. No reproduction allowed without written permission.
Interested in advertising on OCAU? Contact us for info.
|
|