|
|
|
|
|
CoolerMaster AquaGate Liquid Cooling System |
|
Join the community - in the OCAU Forums!
|
Installing the Waterblock and PCI Card
One area where I cannot praise CoolerMaster highly enough is making the AquaGate so simple and easy to install and operate. I am fairly confident in saying that anyone who can assemble their own computer, or change the heatsink on their CPU should have no problems installing and using the AquaGate system.
Firstly there is the 304 page Instruction Guide luckily only the first 39 pages are in English, so it is not as daunting as it first looks. Then, the comprehensive inventory of well engineered parts that easily fit together, and importantly the non-leak plugs and non-leaking connector ports allow the major components to be disconnected without hassle or mess. While the non-leaking fittings may impede water-flow somewhat, due to the restrictive inlet valve size and flow control mechanism, their inclusion made moving or adjusting the AquaGate simple and (relatively) mess free.
The Instruction Guide includes a set of simple flow-charts to indicate the correct procedure for installing the Liquid Cooling System. Comprehensive instructions were provided for the different CPU mounting types and the different ways that the AquaGate can be mounted.
Mounting the Waterblock:
The AquaGate kit includes two lengths of clear vinyl tubing (inside diameter 1/4", outside diameter 3/8"), and since each is about 1.3m long this should be more than enough for mostly every situation. If fitting the unit internally it should be possible to use only one length of tube cut in half.
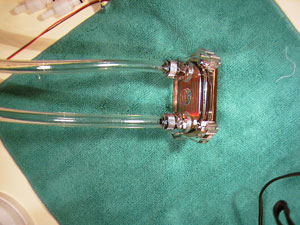
The first step to assemble the system is to fit the brass screws over the ends of the tubes, and attach them to the top of the water block, as per the photograph above.
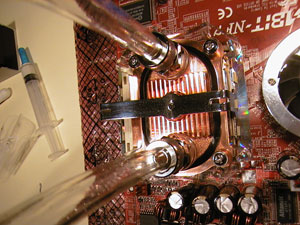
Attaching the waterblock to the top of the CPU is obviously going to depend on the type of CPU being used. Our test system has an AMD AthlonXP 2400+ CPU and ABIT NF7-S motherboard, so it was fairly easy to mount the block using the included metal spring-clip. While I did remove the motherboard from the case to install the waterblock, the mounting process was quite simple and it could have been done in place. CoolerMaster also included a thermal probe and the instructions indicated that it should be installed under the waterblock and close to the CPUs core.
Note that flat section of CoolerMasters thermal probe is significantly longer than usual, this allows for much easier installation.
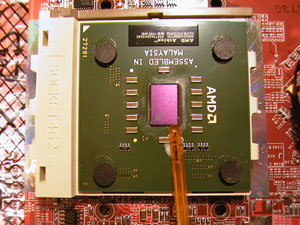
The Instruction Guide and diagrams were a little confusing at this point - they appeared to indicate that the thermal probe would sit between the CPU's core or heat-spreader and the waterblock. Given that this would have a rather adverse effect on heat-transfer, I took the logical approach and installed the probe stuck with a tiny bit of Blu-Tac next to the CPU core.
The waterblock was mounted using a small amount of the thermal conductivity grease that CoolerMaster include in a syringe as part of the kit. While they do not indicate the components of the thermal paste, to me, it had a definite silver tinge which made it look more like an Arctic Silver type product rather than generic silicon-based thermal compound.
The PCI Card:
This is a small PCB with a number of attachments: dual D-bus cable ports, LCD extension port, connections for the thermal probe and shutdown sensor cable and a molex power connector. While the PCI card is installed into a PCI slot, there are no contacts on the bottom of the card, and it just uses the slot to hold itself securely in place.
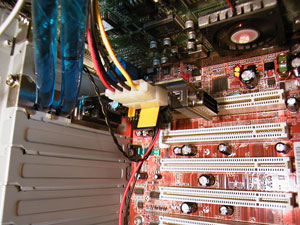
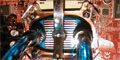
The PC and AquaGate (installed externally) are running in this picture, note the attached Molex connector and attached shutdown sensor cable.
CoolerMaster have designed the PCI card to allow for both internal and external mounting of the LCU. When mounted externally the metal backing plate has two cut-outs to allow the tubing to pass outside the case. There are also an internal and external D-bus port on either side of the PCI card, and if using the LCU internally the external AC power cord can be passed in through the backing plate.
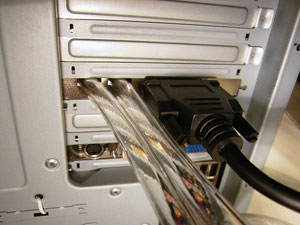
I found that when setting up the PCI card for an externally mounted LCU, squeezing the pipes into place, positioning the PCI card, slotting and then screwing it into place was a tricky process, which involved an extra set of hands. The cut-out holes in the back plate of the PCI card were not quite large enough to allow for easy fitting. It would also have been nice if they had included some sort of rubber-grommet or other protection to prevent the tubing from being pinched or damaged once it was in place.
With the PCI card installed, the Instruction Guide indicates that the thermal probe and shutdown sensor cable should be attached to the appropriate header on the card. The shutdown sensor cable is actually a Y-branched pass-through cable. One end attaches to the PCI card, the other end attaches to the motherboards power on/off header. The PC cases on/off power cable is connected to the other end of the Y-branch.
The Shutdown Cable:
When properly attached and configured the shutdown sensor cable allows the AquaGate to shutdown the system if a temperature, water level or fan failure alarm is triggered. Unfortunately the setup is not as fool-proof as it sounds, and in some situations the system will not be shutdown at all.
Given that the AquaGate uses a passthrough-cable to shut down the system if it overheats, I would have though it would be logical to shut the system down if the pump fails, or its power cord becomes disconnected, but this is not the case there does not appear to be any direct monitoring of the pump. However in this situation, the AquaGate would still shut the system off when the CPU temperature reaches the alarm value.
Perhaps more importantly, since the D-bus cable provides power and connectivity to the AquaGates internal circut board and LCD brain, if the LCU unit is not connected to the PCI card via the D-bus cable, the AquaGate fails to function at all - even the pump will not work. Dangerously, in this situation, with the AquaGate and pump not working, the computer system still powers-on as usual and works as normal, without any cooling of the CPU other than the thermal mass of the copper block and liquid that it contains. While this proved adequate for a short period, I would expect that it would not last too long. Strangely in this situation, although AC power is supplied directly to the pump, the pump does not function without the PCI to D-bus to internal circutboard/LCD connection also in place.
As I also found out later and only noticed after taking a photograph of the inside of the case the system will continue to function without the shutdown sensor cable being connected to the PCI card at all. Obviously in this situation, the AquaGate would fail to shut down the system even if an alarm is triggered.
|
|
Advertisement:
All original content copyright James Rolfe.
All rights reserved. No reproduction allowed without written permission.
Interested in advertising on OCAU? Contact us for info.
|

|