|
|
|
|
|
Asetek VapoChill Mk2 Premium Edition |
|
Join the community - in the OCAU Forums!
|
Installation
Installation
This section isn't intended to replace the installation section of the VapoChill manual, of course, but I think the installation and socket-sealing process is interesting enough to warrant an in-depth examination. Simpler installation is one of the benefits that Asetek claim for the Mk2 VapoChill as seen here and, while I've never assembled the Mk1, I can offer my feelings about the Mk2 process here.
Condensation Concerns
Installation is not a simple case of slapping the cooler on and firing it up. As soon as you deal with sub-ambient temperatures, the issue of condensation arises. Condensation occurs when warm, moist air touches a cold surface. If the temperature difference is enough, the air touching the cold surface will cool so much that it cannot hold as much water as when it was warm - it dumps that water onto the cold surface. Consider that lowering your CPU core's temperature would normally also lower the socket, the CPU pins and even the motherboard to dangerously low temperatures. Pure water is not particularly conductive, but the water from the air already contains impurities and will soon absorb more - ultimately, a short-circuit and system damage is likely. Components will also corrode if water is left sitting on them. Preventing condensation is therefore a major focus of the VapoChill installation system. The first way it achieves this is via the use of insulating foam and paste to prevent ambient air from touching the very cold components. Secondly, it uses small heating elements to raise the temperature of the motherboard and evaporator shell to above ambient, so that condensation won't form on them. This works the same way as your car's rear-window demister, which heats the glass so that, on cold days, the warm air inside the car won't leave water condensing on the inside of the window, cooled by the flow of cold outside air over the car.
Installation of the CPU kit
The very first step is simply to mount the motherboard on the removable motherboard plate from the case. Interestingly, VapoChill provide plastic standoffs for this purpose, instead of the more conventional brass ones we're used to recieving with other cases.
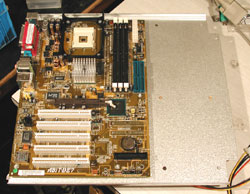
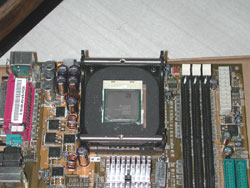
Then, you reinstall the removable backplate, lay the case on its side and spend a little while aligning the evaporator with the socket on the motherboard. Note the copper face of the evaporator - this is the 1mm thick plate separating your CPU core from super-cold refrigerated goodness.
This alignment process is to ensure there's no stress on the tubing when the evaporator is secured to the motherboard. Both the manual and their website assure you not to be too paranoid about bending the tubing leading to the evaporator - it is designed for this purpose and is quite strong. From the feel of it, I assume it has some kind of metal mesh under the insulating foam which gives it both strength and the "memory" to stay in position when you bend it.
After some fiddling and bending, taking care of various warnings about the tubing - like not letting it press up against anything, as crushed foam does not insulate well, and making sure it's not above horizontal before it re-enters the compressor - you should end up with the evaporator resting right on the socket by itself. Remember that the case is on its side at this point.
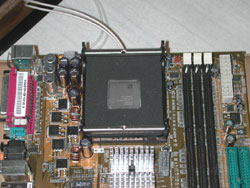
The next step both the manual and this review cover only briefly, but in reality a whole section could be set aside for the several sub-steps involved. Basically, you remove the black plastic heatsink mounting frame from the motherboard, remove the mounting lugs from the frame, place a peice of insulation under the frame and re-mount it to the motherboard using some VapoChill-provided metal screws and plastic nuts. I think the manual could be a lot clearer about replacing the actual mounting hardware, it took me a little while to work out what they meant. Anyway, the end result of this first mounting step is this:
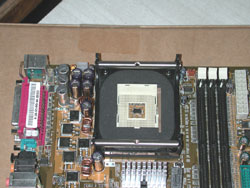
Note that the socket now has insulating foam all around it and that there are two metal rods running between the arms of the plastic heatsink mounting frame. These metal rods are used to secure the evaporator later. From the back, the motherboard looks the same except for 4 small plastic nuts holding the frame in place - we'll see them later on. Although I didn't have a problem with these ones, it important when using plastic nuts with metal screws to push the screw the motherboard hole and then tighten the nut - don't try to use the nuts to pull the frame down as you risk stripping the plastic thread off the nut.
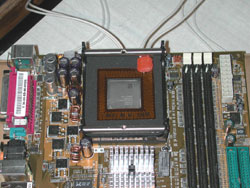
Next, you fill the socket with sticky goop.
Or, to be more precise, you seal the inside of the socket with the Heat Conduction Compound (HCC) that VapoChill give you. They provide a pipe-cleaner to spread the HCC around and make sure there's no gaps etc. You also put a liberal coating on top of the pin-array area, so that the pins are insulated to prevent condensation forming and the dreaded "pin rot" of pins rusting inside the socket.
It's a little difficult to see in that picture, but the whole pin area is covered with HCC - not just the centre of the socket. A small square of insulating foam is provided in the Socket 478 mounting kit, to fit inside the socket, on top of the HCC.
Of course, you also insulate the back of the CPU with HCC. After you've installed the CPU, the pins will also be covered with the HCC that you spread on the pin area of the socket in the earlier step.
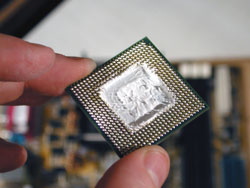
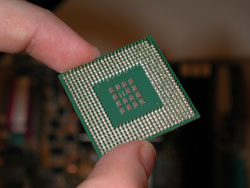
At this point, you may be questioning your sanity. I believe this is normal and may be safely ignored. Install the CPU into the motherboard.
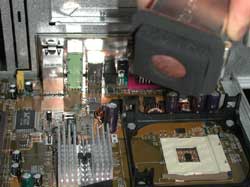
Now, you turn the motherboard over - note the four white plastic nuts we mentioned earlier. On the back of the motherboard you install the first heating element.
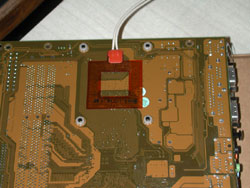
This is very similar to the demister wires in the back windscreen of most cars. It's simply a long resistive wire, shaped to go around the back of where the CPU core lines up with the back of the motherboard. A current applied to this (by the ChillControl unit) heats the wire, and hence the motherboard, to prevent condensation from forming on it.
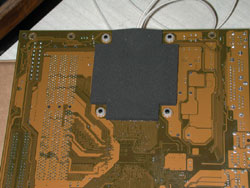
Just to be sure, there's also a big panel of insulating foam that goes over the heating element.
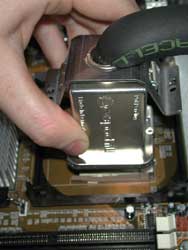
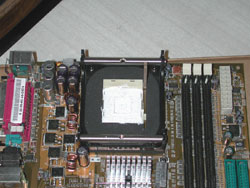
Flipping the board back over, we put the final peice of insulation on the top of the socket, around the CPU.
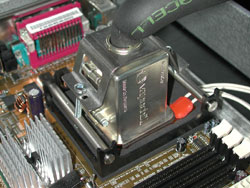
The second heating element goes on top of the insulating foam. This element heats the outside of the evaporator and stops condensation forming there. At this point, a thin layer of HCC is put on the CPU core to improve thermal contact with the evaporator. You could no doubt use Arctic Silver 3 or some other aftermarket product if you were confident it could handle the extremely cold evaporator temperature. I used the HCC that VapoChill provided.
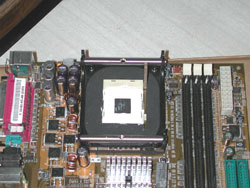
Finally, the evaporator is secured with screws, on top of the heating element, the insulation, the HCC goop and of course, underneath all that, the CPU. When the evaporator is screwed into place, if you've done it correctly, the foam will compress and allow the small copper disc of the evaporator to come into direct and reasonably firm contact with the heatspreader on the top of the CPU.
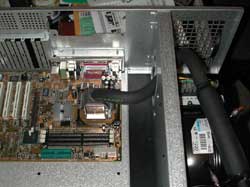
There, we're done. Now all that remains is to install the other components as per usual - power supply, video card, hard drives etc. Then, you can fire it up!
|
|
Advertisement:
All original content copyright James Rolfe.
All rights reserved. No reproduction allowed without written permission.
Interested in advertising on OCAU? Contact us for info.
|

|