|
|
|
|
|
Key-Start Switch Guide |
|
Join the community - in the OCAU Forums!
|
Intro, Type 1
There are many reasons why you would want to change the normal power button on your computer to a key-activated one. Perhaps it is a computer you dont want turned on without your permission, perhaps it is a public computer that you dont want switched on/off.
There are two main types of key-switch that you can put inside your computer. In this guide, I will show you how to make both of them.
Safety note: Before attempting this modification, please remember to disconnect all power from the computer. While there is little to no chance of anything bad happening, you dont want to take ANY chances with electricity. (Ed: This means that if you fry yourself or your PC doing this, OCAU and Baker are not responsible for your pain and misery. Do things like this at your own risk. And don't lick the red wire.)
The first type is a key switch, which is a power switch replacement. To turn on the computer, you turn the key. The second type is an in-line power button "enable/disable" lock. With this type of key-switch, when the key is turned one way, the button will work, when its turned the other way, it will not.
Type 1: Power switch replacement.
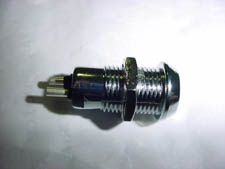
Click to enlarge!
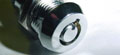
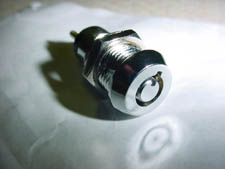
This type is where we replace the standard momentary power switch used to turn on your computer. When the key is turned, it will turn on a computer in the same way as pressing the power button normally would. This is the least secure of the two methods, as I have only seen momentary key-switches in the barrel type (see above image). This uses the same key as most commercial removable hard drive racks, so the key is not unique, hence not secure. This sort of lock is used more to prevent accidental power up/down, or to stop someone being able to reach over and shut your computer down from the front button (i.e. at a LAN).
Parts needed are as follows:
Momentary type lock barrel (Jaycar part number SM1034)
Standard plastic coated wire
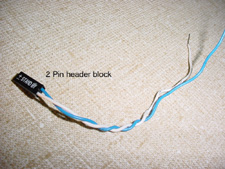
2 pin header block (pictured below), cut from existing power button
Soldering iron, solder, wire strippers, wire cutters, heatshrink, lighter or matches.
If you are cutting the existing 2 pin block from your case, make sure you cut it leaving at least 50mm of wire protruding from the block.
Click to enlarge!
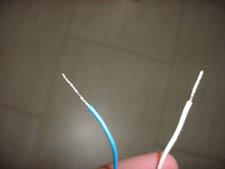
Measure how much cable you will need to mount the key switch from the motherboard PWR_SW connection to the new location of the key switch (I recommend mounting it in a spare 5 ¼ inch bay). Add 4 cm to this measurement, and cut 2 lengths. Strip the plastic coating on each of the wire ends (including the 2 wires protruding from the 2 pin block) back 1.5 2 cm, using either the wire strippers.
Click to enlarge!
Depending on the size of wire you are using, you may or may not need to do this next step. Look at the diameter of the two holes on the back of the lock barrel. You will be inserting the wire into here, and you want a snug fit.
Click to enlarge!
You may be required to bend the exposed (the bit you stripped) wire in 2 so that it fits snug in the hole. Now, turn on your soldering iron, and tin all of your stripped wires.
Insert one of the lengths of wire into the terminal hole on the back of the lock barrel. Seal it up with solder. Do the same with the other length of wire.
On the other end of the wire, slip 2 pieces of heatshrink over each end so it will cover the exposed wire protruding from the 2 pin block as well as the exposed section of the wire coming from the lock barrel.
Solder the loose ends of the wires coming from the lock barrel to the wires coming from the 2 pin block. You should end up with two wires leading from the 2 pin block to the two terminals on the back of the lock barrel.
Move the heatshrink to the appropriate location and shrink it with a flame.
Mounting is probably the hardest part of creating this switch. Look at your lock barrel. You will notice that it has a circular appearance, but 2 sides are flat. This is to stop the barrel just spinning when it is mounted. You need to re-produce these grooves when making the hole in your desired mounting position.
Fit the lock barrel, and reconnect the 2 pin block to your motherboard PWR_SW header.
Turn the key. The system should fire up as if you had pressed a power button. If not, go back and check all of your solder connections.
|
|
Advertisement:
All original content copyright James Rolfe.
All rights reserved. No reproduction allowed without written permission.
Interested in advertising on OCAU? Contact us for info.
|
|