|
|
Advertisement:
|
|
Cooler Master Aero 7+ and Spire WhisperRock IV |
|
Join the community - in the OCAU Forums!
|
Introduction, Cooler Master Aero 7+
The humble heatsink has come a long way since the little dinky 40mm thing that shipped on the early Intel Pentium chips. Every couple of months manufacturers release a new heatsink design that is intended to out perform all the others on the market. Each time a manufacturer thinks of a new method of air cooling, generally the whole market follows. We have gone from 40mm to 60mm and now to the standard 80mm fan. In between there we had 60mm to 80mm fan adapters for the hardcore who wanted the best air performance. Eventually, these stepped aside for bigger heatsinks that an 80mm fan could bolt straight onto. Next was the conversion from aluminum to a combination of aluminium and copper and ultimately solid copper heatsinks. Somewhere in the middle of all that, skived heatsinks made an appearance with fins peeled away from a solid block of copper/aluminium for maximum heat transfer.
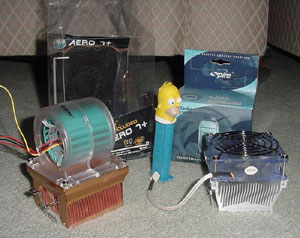
Today I am looking at two relatively new heatsinks for Socket 370 / Socket A CPUs: the Cooler Master Aero 7+ and the Spire WhisperRock IV.
Cooler Master Aero 7+
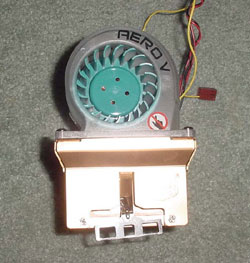
The Aero 7+ is Cooler Masters new high end heatsink that utilizes blower technology. In an effort to remove the dead spot that conventional fans cause in the center of the heatsink, Cooler Master started using a blower type fan. Although in theory this would increase the cooling of the heatsink it was interesting to see if it was as good in practice. They have the following details about the Aero 7+ on their website:
Cooler Master Aero 7+ Specs:- Model: Aero 7+
- Fan Dimension: 80 x 80 x 70 mm
- Rated Speed: 1900~3500 rpm
- Air Flow: 10.9~20.0 CFM
- Rated Voltage: 7~13.8V
- Heat Sink Dimension: 71 x 71 x 38 mm / 80 x 80 x 51 mm
- Heat Sink Type: Copper Skived Fin
- Air Pressure : 2.9~10.7mm H2O
Cooler Master Aero 7+ Features:- Blower's newest design let the cooler able to blow towards the centre of the heat sink.
- More powerful blowers produce larger air pressure than traditional axial fans.
- External fan speed adjustment on PCI and 3 1/2" bracket allows user to set the desire fan rpm (1900~3500) without opening up the chassis.
- Aero 7 is for Socket A, 370, 462, 7 and it uses copper stacked fin design.
- Multilingual Installation Guide included.
- Aero 7+ is an improved version of Aero 7
- Improved thumb-clip to avoid blocking with PSU or RAM modules
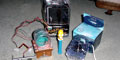
Contents:
The Aero 7+ comes in a large see-through plastic package. This helps to protect the heatsink and other contents from damage in transit. The first thing you will notice is the weight of the package - at around 550 grams, this is no lightweight.

Once you cut open the sealed package you will be greeted with a nice little assortment of goodies including:- The Aero 7+ itself
- A tiny installation manual (online here)
- PCI slot for rheobus
- 3.5 cover for rheobus
- Screws for 3.5 cover
- Generic Heatsink Goop
- Cooler Master Case Badge
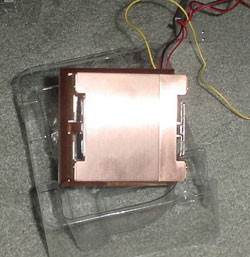
The Aero 7+ has a sticker protecting the base from scratches during shipping. After removing the sticker you will see that the pure copper heatsink has a very smooth base. If you are very pedantic some lapping could be in order but it is definitely not required. The blower fan on top of the Aero 7+ comes with a Molex connector for power to ensure you dont go killing your motherboard fan connectors. It also has the standard sensor connector so you can monitor fan speeds. Finally it has a built-in rheobus that can be mounted either in a spare 3.5 slot or on a rear PCI panel. The instructions are short and to the point. Nine different languages grace the pages of the tiny installation guide. I only looked at it after I had installed the heatsink and surprise surprise I did it correctly. If you have never installed a heatsink prior to this then give it a read, otherwise it's all fairly obvious. The 3.5 cover is brushed aluminum and would look great on a Cooler Master or Lian Li case. Unfortunately the screw holes on the front panel didnt align to the ones available on my Antec SX1040B case. This was easily fixed using some metal brackets I had lying around but a pity Cooler Master didnt notice this while designing the bracket in the first place. Hopefully this will be remedied in the future.
Installation:
The Aero 7+ installs using the 3 socket lug method which is very common these days. This is a good thing as I wouldnt dare trust this heatsink holding on to 1 lug. The clip also has a handy handle that allows the heatsink to be installed and uninstalled without the use of a screwdriver. The size of this heatsink does make installation a little bit more cumbersome but it didnt take any longer to install than other heatsinks I have used. Although this heatsink is quite large I had no issues fitting it on my Epox 8RDA+ motherboard. Once the heatsink is clipped in, its a simple matter of plugging in the Molex connecter, the fan header and then mounting the rheobus. I chose to mount it on the front panel as I had a spare 3.5 slot but if you dont plan on adjusting the fan speed often you could mount it on the back or even leave it inside your case.
After all this, all that remained was putting the side back on the case and powering her up. When I first saw the size of the blower on this heatsink I was concerned that my relative silence may come to an end. Happily this was disproved when I turned my system on. At its full speed of ~3600rpm the blower is noticeable in my system. While I dont have the correct sound measuring tools I would say it is about on par with the default AMD 2100+ cooler, possibly a little less annoying. It is definitely nowhere near as bad as my old Volcano 6+. At 2500rpm it is only slightly louder than the Spire Falcon Rock II, a very quiet cooler, and at 1600rpm the Aero 7+ is completely silent.
|
|
Advertisement:
All original content copyright James Rolfe.
All rights reserved. No reproduction allowed without written permission.
Interested in advertising on OCAU? Contact us for info.
|
|