|
|
|
|
|
ABIT IC7-MAX3 i875P Motherboard |
|
Join the community - in the OCAU Forums!
|
Board Layout, BIOS
BOARD LAYOUT
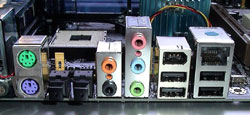
Like the original IC7 the Max 3 comes with a black coloured PCB. ABIT used a black PCB already for their first Max board, the IT7, and it seems that this is becoming the standard colour for their high-end products. Due to the many hardware features ABIT has implemented on the Max 3 the PCB is packed with chips, connectors, ports and other items. We imagine that ABIT engineering had a hard time to come up with a clean layout for this board. They have not opted for a larger than usual PCB: With 305 mm x 245 mm the Max 3 does not occupy more space in your case than other fully equipped 875P boards like Gigabytes 8KNXP or the ASUS P4C800-E. The Max 3 does not have (legacy) serial and parallel I/0 ports. The OTES exhaust fan as well as 2 additional audio ports and SPDIF (Sony/Philips Digital Interface) connectors take the space gained by skipping the legacy ports on the I/O panel. The 2 ASUS boards P4C800-E in our test have a simple 3-port I/O audio solution.
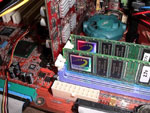
The OTES cooling system is occupying a lot of space. Its airduct is coming very close to the CPU socket area. On the opposite side of the CPU socket the mighty new MCH HSF is residing. Many potential users are concerned whether larger CPU heatsinks like Swiftechs MC 4000, the Zalman 7000 series, or Thermalrights SLK- 900/U are still fitting in these rather cramped conditions. We used the Swiftech MC 4000 and can confirm that this heatsinks fits. One might even think that ABIT engineering constructed the OTES airduct with the MC 4000 in mind. The air from the MC 4000 is pressed into the housing by the MC 4000 fan and sucked through the housing by the OTES fan. This is possible because the air is leaving the MC 4000 sink area exactly where the OTES housing has been kept open to take in the air from the PCB area. This way the airflow in the housing is accelerated and the hot air from the CPU transported as fast as possible out of the case.
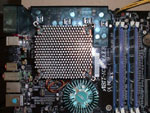 
Another matter of concern is the clearance between the large Max 3 MCH/Northbridge sink and the AGP socket when using heatpipe devices from Zalman or Thermaltake for video card cooling. These devices need a lot of space on both sides of the video card. The Max 3 MHC heatsink has a diameter of 55 mm and a height of 30 mm. The clearance between the MCH sink and the AGP socket is 10 mm; the clearance between MCH sink and the installed video card is 12 mm and around 10 mm between MCH sink and CPU heatsink retention frame. A minor but nonetheless important point is that the Max 3 has a metal CPU socket lever. Its a shame that many manufacturers, such as ASUS with their P4C800-E are still using a plastic socket lever even on high-end mainboards to save a few cents. We have recently broken such a plastic socket lever rendering the board useless.
On quite a few mainboards, for example ABITs IS7, the DIMM sockets are dangerously close to the AGP socket as shown in our IS7 test report. That is not the case with the Max 3. Even when large video cards like the 9800 Pro with 256 MB video memory are installed, it is possible to safely insert RAM modules without removing the video card.
 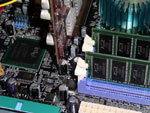
IS7 (left) and Max3 (right) AGP/DIMM clearance
Interesting are the flat-lying IDE ports 1 and 2 positioned at the fringe of the PCB. We have seen this configuration already on the IS7 and the IC7. Although its a little more difficult to plug PATA cables in this way, it keeps them out of the way and prevents the usual cable mix-up in the airspace over the PCB. ABIT managed to keep the room between the PCI slots free of connectors. Several boards like the ASUS P4C800-E have connectors for fan power or audio auxiliary devices installed between the slots. Using these connectors becomes basically impossible when the PCI slots above and below are occupied. We experienced this problem when we recently tested a Video Tuner card on the P4C800-E.
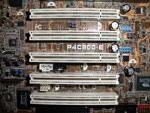 
P4C800 (left) and Max3 (right) PCI slot area
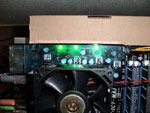
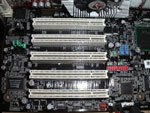
A detailed comparison of the original IC7 and the Max 3 PCB reveals that ABIT changed the PCB circuitry. In particular the area where the power supply components are located looks different: the number and location of capacitors, coils and the transistors around the CPU socket has been changed. Although the Max 3 PCB has to accommodate many space-requiring hardware features such as the 4-channel RAID controller and 6 SATA ports, as well as the large OTES cooling system, ABIT managed to keep the PCB layout clean. We did not find a single flaw. It is obvious that ABIT has opted for quality with this mainboard as shown by the well-designed box interior, the carefully packaged parts and many small details like the Texas Instrument IEEE 1396 chip, rounded PATA cables, the OTES LEDs and the metal CPU socket lever. The Max 3 is oozing quality and care from every angle you look at it.
BIOS
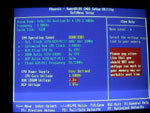
The Max 3 comes with the popular blue Phoenix AWARD BIOS. For most users this BIOS type is easy to navigate because they know the structure already from other boards. An ABIT specialty is a BIOS section called SoftMenu where most of the BIOS tools for overclocking can be found. SoftMenu offers the user the following options on this motherboard:- Front-side-bus frequencies between 200 MHz and 412 MHz
- CPU strap selection for Pentium 4 processors with a 100, 133 and 200 MHz system bus
- CPU to RAM ratios of 1:1, 5:4, and 3:2 for C type (800 MHz) Pentium
- Several ratios and fixed frequencies for AGP and PCI devices
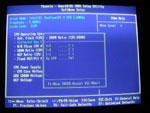
- Voltage for the CPU up to 1.90 volt, for memory up to 3.2 volt, and for AGP up to 1.65 volt.
With only 2.8 volt for the memory the original IC7 was criticized for not offering sufficient DDR voltage for hardcore overclocking. Many PC 3200, PC 3700 and PC 4000 modules need around 3.0 volt to reach their maximum frequency headroom. With a maximum memory voltage of 3.20 volt the Max 3 is certainly up to the job now. As far as we know there is only one 875P chipset based board in the market with more DIMM voltage than the Max 3: This is the Epox 4PCA3Plus offering 3.3 volt for the memory.
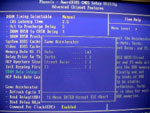  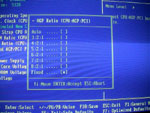
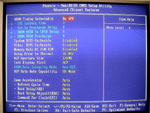
L to R above: Game Accelerator, RAM Ratio, AGP Ratio
The BIOS Advanced Chipset Features give the user a wide range of options to tune the memory. The ABIT Game Accelerator is residing here as well. ABIT made headlines with the introduction of this technology, because it made their 865PE chipset based IS7 as fast as 875P boards, as seen in our review. The Max 3 naturally doesnt need this. On the ASUS P4C800-E and most other 875P boards, PAT can be switched on and off - but thats it. The Game Accelerator has 3 pre-defined performance settings named after motor sport categories. Turbo is the softest stage of acceleration, followed by Street Racer and F1 as the most aggressive settings. These settings allow selecting the system performance level dependant on the latency level of the memory modules. It seems that F1 is only working with a small number of memory modules with very low (aggressive) memory latency. We tried WINBOND PC 3200 (CH-5 chips), TwinMOS PC 3700, and A-DATA PC 4000 (review here). We could not boot with any of these modules when F1 was selected.
It is however possible to configure the Game Accelerator manually, by selecting 4 individual parameters instead of one predefined setting. After various test runs we found that Refresh Cycle Time has the biggest impact on performance. Setting it to aggressive gives the same impact as Street Racer.
The Advanced Chipset Features section offers a plethora of tweaking options. In combination with the SoftMenu settings it takes days to test them all and find out their impact on system performance. A best practice recommendation is not possible because it depends on the quality of each individual users memory modules, to decide which one of the many possible combinations of settings is most beneficial for system performance.
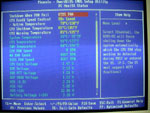  
L to R above: PC Health Status, Voltage Adjustment, Advanced Chipset Features
The Max 3 BIOS is providing a wealth of system information on the PC Health Status screen. We counted not less than 16 parameters which are constantly monitored. Several parameters, such as the CPU temperature and the OTES and MCH fan rpm can be set to trigger warnings or system shut-down at certain given levels. The Max 3 is, as are many other ABIT mainboards, undervolting. The actual CPU voltage for example is 1.635 volt as shown by PC Health Status, when it is set to 1.65 volt by the BIOS SoftMenu. However, having a maximum of 1.9 volt for the CPU and 3.2 volt for the memory makes it easy to compensate for this by setting the voltage higher from the beginning. We also found the actual voltage on the 5-, 3-, and 12-volt rails running below default. We could fix this by increasing the voltage output from our ANTEC 550 True Control PSU. Users with a PSU without potentiometers might find it annoying though and have to live with the lower than default voltage. The only item we are missing in the Max 3 BIOS is the option to disable Spread Spectrum. This feature is modulating the CPU frequency to avoid electromagnetic inference with other electronic devices such as TV and telephone sets. Its mandatory in many countries to have it enabled by default, and only a few mainboard manufactures, such as ASUS with the P4C800-E and P4P800 have therefore a BIOS option to disable it. It is said that disabling Spread Spectrum can improve stability when overclocking and many user keep it therefore disabled.
The Max 3 BIOS is the most complete and powerful BIOS when it comes to CPU and RAM overclocking as well as system monitoring of all 875P boards we know. However, not everything was gold with the specific BIOS version we were using - more about this later.
|
|
Advertisement:
All original content copyright James Rolfe.
All rights reserved. No reproduction allowed without written permission.
Interested in advertising on OCAU? Contact us for info.
|

|