Intro to Nitro, Running-In, Driving
Intro to Nitro
If you're not familiar with how "nitro RC" cars work, here's a quick primer. The car still has a radio receiver and servos for steering and throttle, so some batteries are needed. However, instead of a large battery to power an electric motor, you have a fuel tank and a small piston engine, usually two-stroke, complete with air-filter, carburettor and exhaust pipe.
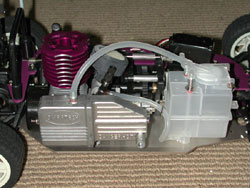 
This engine runs on "nitro fuel", which is mostly methanol, but also contains a percentage of oil to lubricate the engine and a percentage of nitromethane. Nitromethane is where the real power of the motor comes from - it's the same stuff as used in top-fuel dragsters. The fuel I used is 15% nitromethane which cost AUD $14.50 for a 1 litre bottle. There are higher percentages available which may give you more power if your car is tuned for them but naturally cost more per litre. For more info on nitro fuel, see this page.
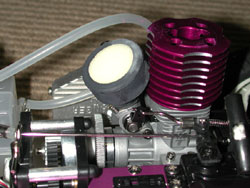
Where does the spark come from? Actually, there isn't a spark at all. Instead of a spark plug in the top of the motor, you have a "glow plug" to provide ignition. This glow plug contains a tiny coil of wire, like a light-bulb filament, which is heated by an external power source (a "glow plug igniter") and then, once the engine is running, is heated by the engine itself. The Smartech car includes a glow plug, but not the igniter. I bought a kit (coincidentally, made by Smartech also) containing an igniter which uses a nicad battery and is charged from a wall plug, along with some other handy bits for AUD $39 from my local hobby shop. In the same way that many types of spark plugs exist, there's also a range of glow plugs available. I used the one that came with the car and a spare "O.S." brand "A3" class plug which cost AUD $7. For more info on glow plugs, see this page.
Connecting the motor to the rest of the drive-train is a centrifugal clutch. Like with a manual car, if you didn't have a clutch to disconnect the wheels from the engine, when the car stops moving the engine would stall. The clutch is automatic on this car - when the revs rise, centrifugal force is used to make the clutch engage. It's completely transparent to the user: you simply accelerate when you want to go, and when you want to stop the car, do so - the engine will idle with the clutch disengaged.
To start the motor, you prime it by pushing a small button on the fueltank to fill the fuel line with fuel. Attach a glow plug igniter as described earlier to the top of the motor and pull the rip-cord to get the motor turning over. Sometimes the motor will flood, which you can feel as an extremely stiff rip-cord, because the liquid fuel flooding the cylinder cannot be compressed. Remove the glow plug and pull the starter cord a few times to blow the fuel out of the motor. Reinstall the glow plug and try again.
Running In
When you receive the car, the carburettor is deliberately set for the car to run quite rich. You will find it splutters around, sometimes spitting spots of fuel from the exhaust, not seeming very impressive. I thought this was deliberate, as the motor has to be "run in", like any piston engine, which simply means to initially use the engine, usually fairly gently, so that its friction surfaces wear properly so that it stays reliable and powerful for as long as possible. The manual says you don't need to run this motor in, but I'm a skeptic and besides, running it in properly isn't going to hurt it.
Running in seems to have an almost religious fervour associated with it, as bands of rivals fiercely debate the best procedure. You could surf the net all day gathering information, as I did for a while, but realistically you can't expect everyone who buys this car to distill information from many sources and thus work out what they should do. This is why we have manuals that come with products, but unfortunately the manual for this car leaves a lot to be desired. After I'd used the car for a while I discovered this guide on ToyRange's forums, but fortunately it wasn't too different to what I'd done anyway.
My basic plan involved running the car with the body off to keep the motor cool, keeping the motor at low revs and a rich mixture for a couple of tanks of fuel before tuning it or giving it full throttle. I live in the Southern Highlands of NSW and, as the name suggests, we're quite a way above sea level, so the air is fairly thin which will make the mixture more rich. You tune the motor by turning a screw (you can turn it by hand) on the carburettor, which adjusts the mixture. I found the car would barely run at all until I leaned out the mixture a touch. Then, a couple of taking-it-easy tankfuls of fuel and I could start experimenting with finding the correct tune. Once I found a setting that allowed the car to rev freely while still seeing a faint plume of bluish smoke from the exhaust when accelerating, I ran another tankful of fuel through the car, varying the revs and never holding full throttle for more than a second. If you run the motor too lean it will overheat and possibly seize, so make sure you can see a bit of oil smoke from the exhaust under power. After all this I felt the motor was run in and I could really give it the berries.
Time to Drive
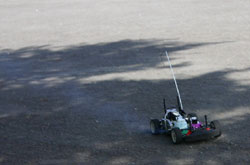
This car really moves when you give it full throttle. The combination of four-wheel drive and good tyres makes it quick off the line, once the centrifugal clutch fully engages. Admittedly I'm used to two-wheel drive buggies on dirt, which spend most of their time spinning the back wheels and sliding around, but this on-road car is a totally different experience. With the default setup I found it would turn hard at full throttle with only a hint of understeer. You could make it slide a little by backing off or even flicking the brake as you turn in, but the car very quickly regains grip and continues on its way. If you want to turn really hard you can use the brake for longer, to get the car really sliding, before opening up the throttle again. If you mess up you can slam the brakes on and bring it to a quick halt. The suspension does a good job of absorbing bumps and ripples in the tarmac, and even with some very aggressive cornering and sliding the car never looked like it was going to flip over. While I was getting used to the car I ran it into a few things at speed with no ill effects, which was a relief.
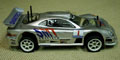
For some bizarre reason I never got an action photo of the car with the shell on. It worked just as well with the shell on, and looked a lot better, but you'll just have to take my word for it. :)
|