|
|
|
|
|
Slug-Sanding How-To |
|
Join the community - in the OCAU Forums!
|
Sanding, Results
Moisten the roughest sandpaper (the lowest grade number, in my case 280). You can dry-sand if you like, but I find wetsanding to be better because it keeps the chip cooler, it makes it a little easier on the arm and it keeps the metal dust and shavings together. I usually do the 280 wet and then the 600 wet, then use the 1200 dry to finish off. I keep a glass of water nearby so I can dip my fingers into it and sprinkle water onto the sandpaper from them. Smooth the drops around on the paper - you don't want to be running your chip through huge puddles of water, you just want very moist sandpaper.
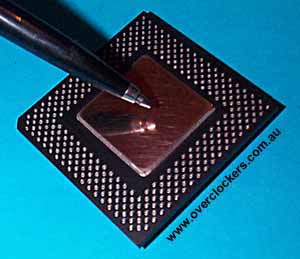
Hold the cpu slug-down (derr) with your thumb and middle finger each on a side. Press down on the middle of the bottom of the CPU with your index finger (between the pins):
I might just take a moment to remind you that you are doing this at your own risk. If you think you're going to be really pissed off (to the point of, say, suing webmasters) if you wreck your chip in the next 20 minutes, stop now. Be happy with whatever speed you're currently stable at. Otherwise...
Remember to keep the slug flat against the sandpaper. Some people say you should do alternating circles, some people say do figure-8's, some people say only do straight lines. What I normally do is do 20 circles, then rotate the cpu 90 degrees, 20 more, rotate 90, 20 more, etc etc etc. I figure that way if there's any bias in the way I'm sanding it should even out over the course of the process. What you really want to avoid is letting the cpu tilt while you sand, so that you end up rounding the corners off. Check it regularly with a flat surface such as the heatsink, or better yet a razor blade edge or steel ruler or similar. I use a little 6-inch steel ruler I bought from the hardware shop for about $6.00.
Now, the primary goal here is to get the slug FLAT. You may reach a flat slug in no time at all. Mine were all not very warped, so what I was really trying to do was get as much of the material off the top of the slug as possible, while keeping it flat. Underneath the silvery stuff there is coppery stuff. Very scientific, I know, but nobody has actually confirmed what the metals we're dealing with here are, as far as I know. But I'll call the coppery stuff copper because it probably is. Sometimes you will get to a completely flat CPU and still have lots of silver on the slug. Sometimes you will have a pattern of part-copper, part-silver. I always sand to full copper, ie, the whole slug is coppery coloured, because I want to get the best thermal transfer I can. Now, warning time: if you sand too far down onto the slug, you will kill your cpu. Under the slug is the silicon bed that is the real heart of the chip. It's actually on the back of the slug. If you expose that your chip is screwed. So be careful how far down you go. Also, even if you don't go all the way through to the silicon, you may weaken the slug to the point where it collapses when you mount a heatsink on it. This is also a chip-killer. So be careful!
 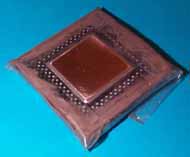
Left: copper showing on all 4 sides - Right: almost finished
Is your arm tired yet? :) You may find your stickytape and static bag are being sanded away a bit. This is not that unusual but try not to break the seal - and definitely don't sand away much of the ceramic package (the dark outer bit that the pins are sticking out of).
When you have a lovely polished flat surface, carefully blow or vacuum away all the dust and metal shavings and cut the tape and staticbag away from the cpu. It's easiest if you cut along the sides of the cpu casing and pull the bag apart that way. Vacuum and clean the cpu properly with a tissue, clean your hands thoroughly and clean up your work area. You may want to rinse the sandpaper off so you can use it again - I use wet/dry sandpaper so I just take the whole glass sheet into the shower and rub it almost clean. Now stand back and admire your masterpeice!
mirror mirror on the slug
Now - was it all worth it? In my experience yes - every one of the 6 C366's I've sanded to full copper have shown a drop in temperature - usually 1 or 2 degrees C. This can be all the difference between stability and crashes when you're on the edge. It makes a much more marked difference if you're looking into active cooling - my 2 best C366's would lock up just after loading W98 at 616MHz with a 40W peltier on them - they run well enough to install Sandra and run a few benchmarks now. They'll even let me play about 10 minutes of Sports Car GT! Click here for the full Peltier Experiment story.
So don't expect miracles - but do expect a difference. If you're right on the edge and you think heat is the problem, sanding might pay off. Of course, as I keep saying, you are taking something of a risk with the CPU - not a big risk in my experience, but as with all things when overclocking - nothing's guaranteed. :)
This article was originally written before we had our Forums - the next page contains comments from readers.
|
|
Advertisement:
All original content copyright James Rolfe.
All rights reserved. No reproduction allowed without written permission.
Interested in advertising on OCAU? Contact us for info.
|

|