|
|
|
|
|
PCRange 3.5" USB 2.0 External Case |
|
Join the community - in the OCAU Forums!
|
Introduction, Installation and Usage
There's an old saying in the computer industry: Never underestimate the bandwidth of a station-wagon full of tapes. Don't ask me who said it originally, the original phrasing or the story of how it came about - that's all long ago sunk into the mists of time and the depths of a zillion contradictory webpages. The point is that storage capacity tends to far outstrip your ability to transmit data. Even nowadays, with residential ADSL and cable, we're finding more and more data, with bigger and bigger hard drives to store it all on. If you wanted to send a couple of GB to a friend or colleague, how would you do it? Definitely not via the Internet. You'd have to find some sort of portable media that you both have in common and cart it over to his PC. Home-use tape drives are a rare beast these days, while carting a stack of CD-R's to a mate's place is pretty common... but wouldn't it be a lot more convenient if you could just take the hard drive itself?
You could just drag the drive over there by itself, pull your cases apart and install it, assuming there's a free IDE port and space inside the case. If you both have one of those removable IDE caddies then you're fine. But, there's several incompatible brands and most people don't have any of them. However, most people DO have USB ports - even on laptops and Macs.
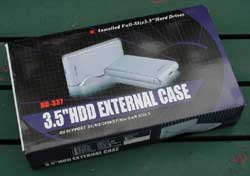
PCRange sent over their external caddy for 3.5" IDE hard drives. This is a little IDE controller in a chassis that connects a hard drive to a PC via USB2 - and is backwards compatible with the slower USB1.1 standard. USB is everywhere now - I remember when people with fairly specific needs used to rave about it but it didn't interest me much. Now it seems everything, from digital cameras and keyboards to personal fans and shavers sports the distinctive USB jack. We actually reviewed a USB caddy for laptop hard drives here early last year but the USB1.1 connection made it pretty slow and hardly practical. USB2 is becoming a common inclusion on motherboards and laptops now. It promises much more speed, but is it enough?
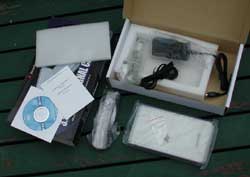
Included in the box is the enclosure itself, a plastic stand, a USB cable, a driver CD and small installation leaflet for the software. There's no actual manual included - the back of the box has diagrams showing how to install a drive and connect it to your PC. There's also a small power-pack with cord included - the unit requires this power pack to be connected to mains power, so it's perhaps not as portable as you may have thought. Having access to the contents of a hard drive on your laptop is great, but this unit will stay on your desk unless you carry a long extension cord or UPS with you when you take your laptop to the beach. This is a limitation of USB that we'll cover more on the next page.
The Enclosure
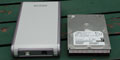
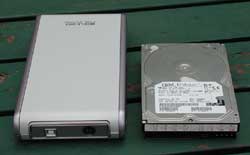
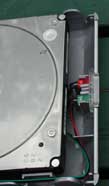
The unit itself is quite attractive - barely larger than the drive it encloses, with a metal cover and plastic ends. At one end you have the small USB connector and a 4-pin power connector I've not seen before. It's keyed to stop you doing anything silly and mis-connecting it, unless you try really hard. At the other end there are two LED's - one green to indicate the unit has power and a red one to indicate hard disk activity. The whole unit slots into the included stand to take up less desk space or can sit flat - perhaps on top of your case. Here we see the unit next to an IBM DeskStar 75GXP drive, to give you an idea of scale:
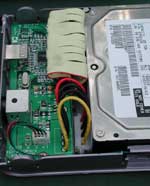
Inside the enclosure is a small printed circuit board (PCB) responsible for converting IDE signals to USB and vice versa, as well as providing power to the drive. A short ribbon cable connects the PCB to the IDE connector on the hard drive and a molex cable does the same for power.
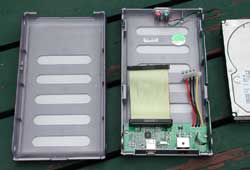
Installing a drive is pretty simple - the most tricky part is probably opening the unit! Small plastic tabs are pushed into the unit at each corner, while you pop the two halves apart like a clamshell. A third arm and fingers of hardened steel will help here, until the little tabs bed in a bit. The picture on the box recommends, I think, using the blunt end of a screwdriver. No idea how that's supposed to work. But, eventually, it pops open.
It's a tight fit for the drive, but it does fit... just. I tried 3 drives - IBM's DeskStar, a Western Digital WD1200JB and an old Quantum Fireball +KA - they were all much the same squeeze, but the cover could be closed with any of them installed.
Usage
Connecting the enclosure to a PC is simple again - as you'd expect with USB. There's no instructions suggesting whether you should plug in power or USB first, but it doesn't seem to matter either way. Once the hard drive has spun up and the USB cable is connected, it magically appears as a local hard drive in My Computer. I tested it on a WinXP Home laptop and two Win2K machines - none of them required the use of the driver CD to recognise the drive. First the system detects a nameless USB Device, then it identifies the hard drive model and you have another drive letter - or two in my case, the drive having already being split into two partitions on another machine.
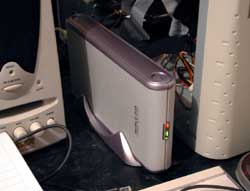
Here we see the unit in action, mounted in the provided stand, with both LED's illuminated during a benchmarking run:
In WinXP you can manually enable or disable write-caching on the drive. This made no repeatable difference for the kind of testing I was doing - mostly long sustained drive accesses. If you were to run applications, games or something else that does a lot of small writes to the drive then you'd be more likely to notice a benefit from the cache. The danger of course is if you unplug the drive before WinXP has finished writing the cache contents to disk, so you can inform WinXP that you are going to unplug it before you do so, making it empty the cache. However, this option was greyed out (caching checkbox unticked) on both Win2K boxes I plugged it into.
|
|
Advertisement:
All original content copyright James Rolfe.
All rights reserved. No reproduction allowed without written permission.
Interested in advertising on OCAU? Contact us for info.
|

|